

Growing Peas at Home can seem daunting, but trust me, it’s one of the most rewarding experiences a home gardener can have! Imagine stepping outside your back door and harvesting sweet, plump peas straight from the vine – a flavor far superior to anything you’ll find in the grocery store. For centuries, peas have been a staple crop, dating back to ancient civilizations. They’re not just delicious; they’re packed with nutrients and relatively easy to cultivate, even in small spaces.
But let’s be honest, sometimes getting those perfect pods can feel like a battle against pests, poor soil, and unpredictable weather. That’s where this DIY guide comes in! I’m going to share my tried-and-true tricks and hacks for successfully growing peas at home, regardless of your gardening experience. We’ll cover everything from choosing the right varieties and preparing your soil to building simple supports and protecting your precious plants from hungry critters.
Why do you need these DIY tricks? Because everyone deserves to enjoy the satisfaction of harvesting their own homegrown peas! Plus, knowing exactly where your food comes from and how it was grown is incredibly empowering. So, grab your gardening gloves, and let’s get started on your pea-growing adventure!
Growing Peas at Home: A Beginner’s Guide to Sweet Success
Hey there, fellow garden enthusiasts! I’m so excited to share my experience with growing peas at home. It’s honestly one of the most rewarding things you can do in your garden. Fresh, sweet peas straight from the vine? Yes, please! This guide will walk you through everything you need to know, from choosing the right variety to harvesting your delicious crop. Let’s get started!
Choosing Your Pea Variety
Before you even think about planting, you need to decide what kind of peas you want to grow. There are three main types:
* Shelling Peas (English Peas): These are the classic peas where you remove the pods and just eat the peas inside. They’re super sweet and perfect for eating fresh, freezing, or using in recipes.
* Snap Peas: These have edible pods that are plump and crunchy. You can eat the whole pod, peas and all! They’re great for snacking, stir-fries, and salads.
* Snow Peas: These have flat, edible pods with small peas inside. They’re also delicious in stir-fries and salads, and they have a delicate, slightly sweet flavor.
Consider your space and what you plan to do with your peas when making your choice. I personally love snap peas because they’re so easy to eat right off the vine!
Preparing Your Garden Bed
Peas thrive in well-drained soil that’s rich in organic matter. Here’s how to get your garden bed ready:
* Sunlight: Peas need at least 6 hours of sunlight per day. Choose a spot in your garden that gets plenty of sunshine.
* Soil Testing: Ideally, you should test your soil to determine its pH and nutrient levels. Peas prefer a slightly acidic to neutral pH (around 6.0 to 7.0). You can buy a soil testing kit at most garden centers.
* Soil Amendment: Amend your soil with compost or well-rotted manure to improve drainage and fertility. Work it into the top 6-8 inches of soil.
* Fertilizing: Peas don’t need a lot of nitrogen, but they do benefit from phosphorus and potassium. You can add a balanced fertilizer (like 5-10-10) to the soil before planting, following the instructions on the package.
Planting Your Peas
Peas are a cool-season crop, which means they prefer cooler temperatures. The best time to plant peas is in early spring, as soon as the soil can be worked. You can also plant them in the fall in milder climates.
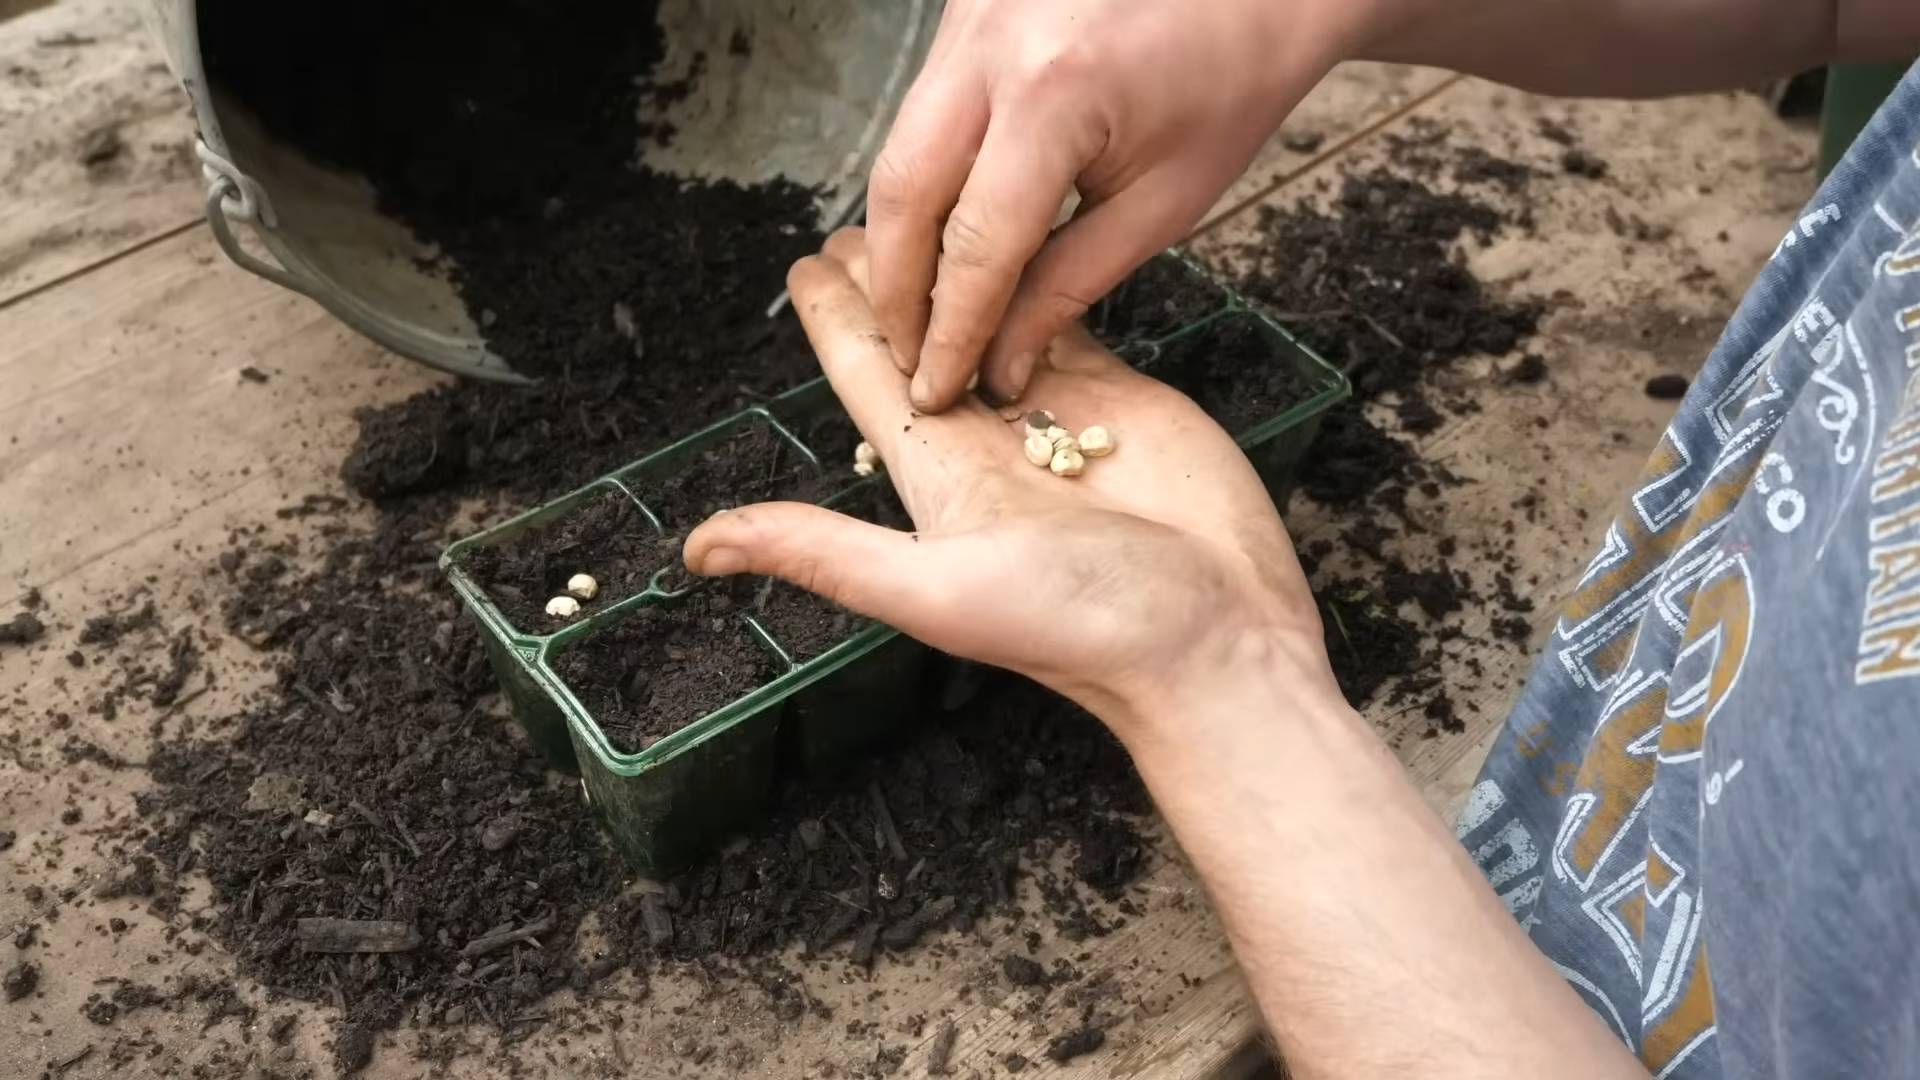
1. Soaking the Seeds: I like to soak my pea seeds in water for 12-24 hours before planting. This helps to soften the seed coat and speed up germination.
2. Planting Depth and Spacing: Plant your pea seeds about 1 inch deep and 1-2 inches apart. If you’re planting in rows, space the rows about 18-24 inches apart.
3. Providing Support: Peas are climbing plants, so they need some kind of support to grow on. You can use a trellis, netting, or even just some branches stuck in the ground. I’ve found that a simple trellis made of chicken wire works great. Install your support system *before* you plant your peas to avoid disturbing the roots later.
4. Watering: Water your pea seeds gently after planting. Keep the soil consistently moist, but not soggy, until the seeds germinate.
Caring for Your Pea Plants
Once your pea plants start to grow, there are a few things you can do to keep them healthy and productive:
1. Watering: Water your pea plants regularly, especially during dry periods. Aim for about 1 inch of water per week.
2. Weeding: Keep your garden bed free of weeds, which can compete with your pea plants for nutrients and water. Hand-pull weeds carefully to avoid disturbing the pea plant roots.
3. Fertilizing: You can side-dress your pea plants with a balanced fertilizer a few weeks after they emerge. Follow the instructions on the package.
4. Pest Control: Peas can be susceptible to certain pests, such as aphids and pea weevils. Inspect your plants regularly for signs of pests and take action if necessary. You can use insecticidal soap or neem oil to control aphids. For pea weevils, you can try hand-picking them off the plants or using a row cover to prevent them from laying eggs.
5. Disease Prevention: Peas can also be affected by certain diseases, such as powdery mildew and root rot. To prevent these diseases, make sure your plants have good air circulation and avoid overwatering. If you notice any signs of disease, remove the affected plants immediately.
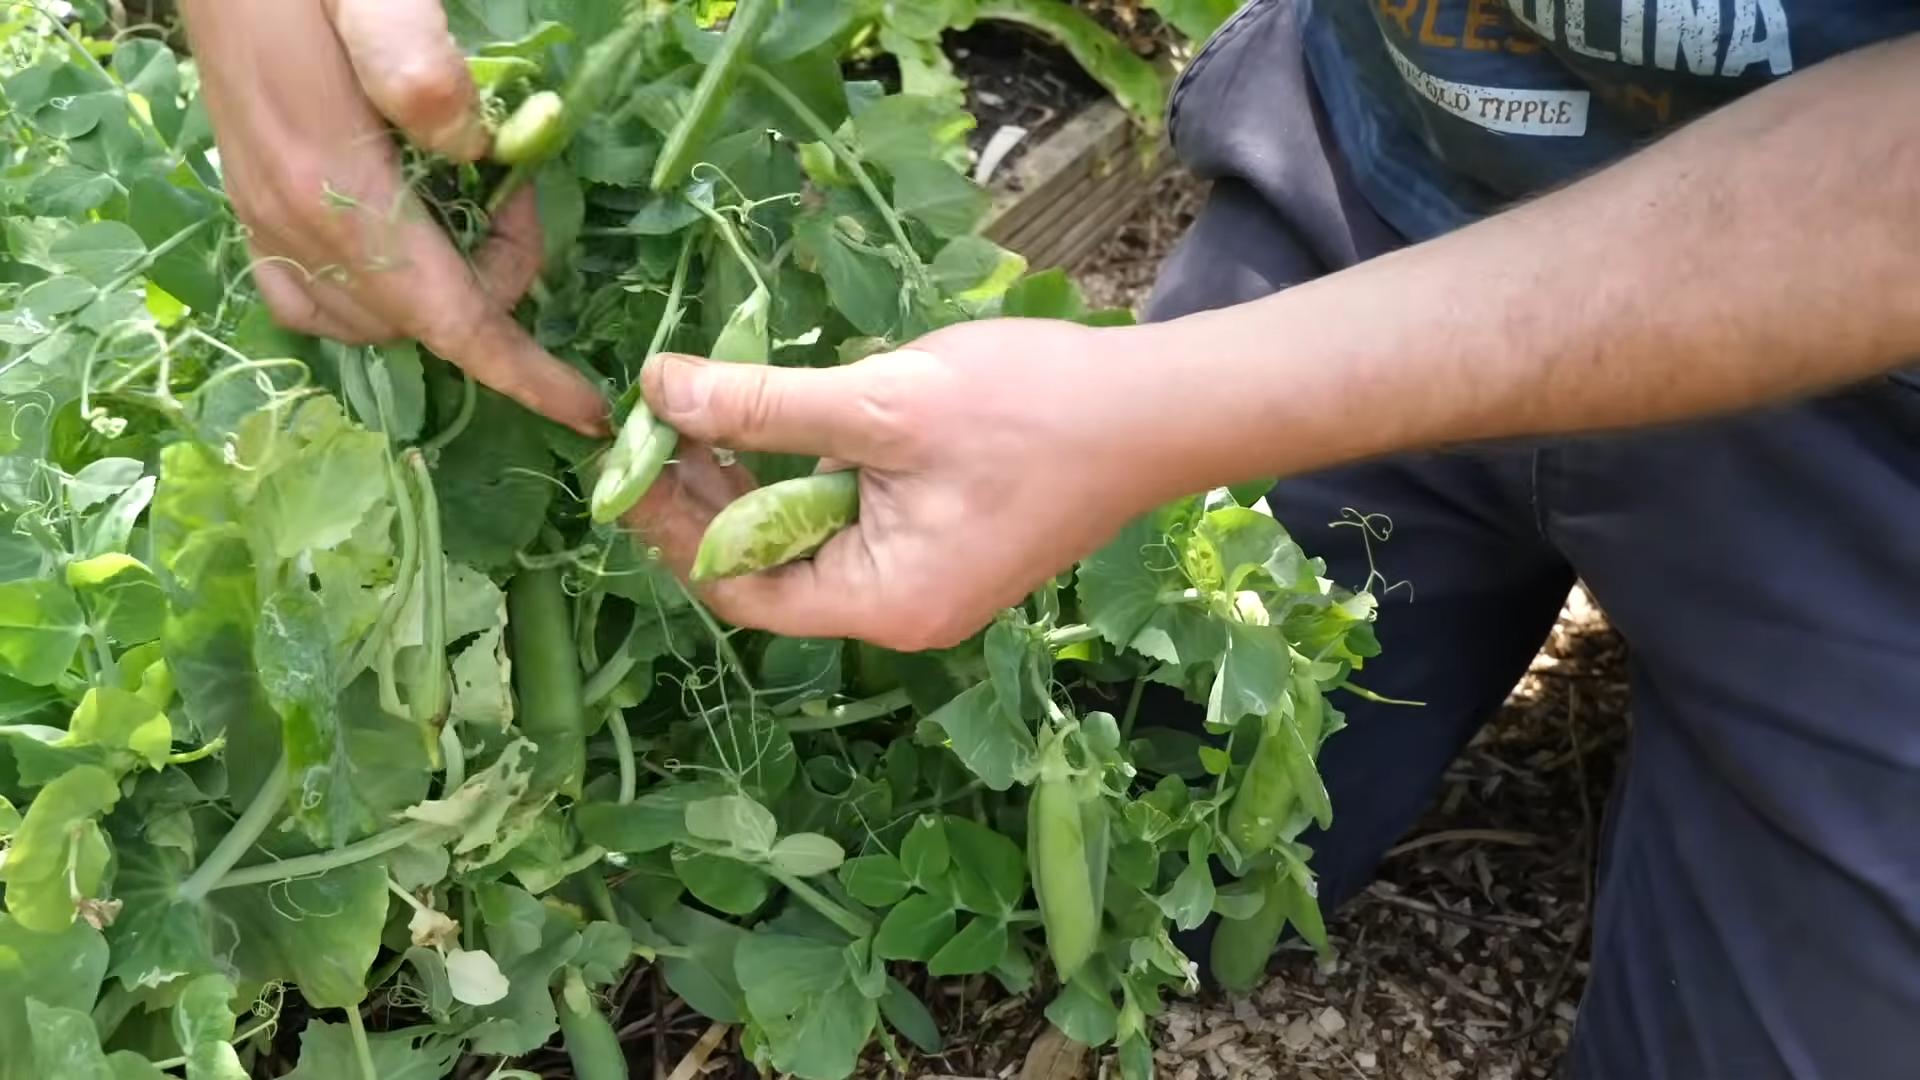
Harvesting Your Peas
Harvesting your peas at the right time is crucial for getting the best flavor and texture.
1. Shelling Peas: Harvest shelling peas when the pods are plump and full, but still tender. The peas inside should be well-developed but not too hard.
2. Snap Peas: Harvest snap peas when the pods are plump and crisp, but before the peas inside become too large. The pods should snap easily when bent.
3. Snow Peas: Harvest snow peas when the pods are flat and tender, with small peas inside. The pods should be bright green and translucent.
Harvest your peas regularly to encourage continued production. The more you pick, the more they’ll grow!
Troubleshooting Common Pea Problems
Even with the best care, you might encounter some problems when growing peas. Here are a few common issues and how to address them:
* Poor Germination: If your pea seeds aren’t germinating, it could be due to several factors, such as cold soil, poor-quality seeds, or overwatering. Make sure the soil temperature is above 40°F (4°C) before planting. Use fresh, high-quality seeds. Avoid overwatering the soil, which can cause the seeds to rot.
* Yellowing Leaves: Yellowing leaves can be a sign of nutrient deficiency, overwatering, or disease. Check the soil pH and nutrient levels. Make sure the soil is well-drained and avoid overwatering. Inspect the plants for signs of disease.
* Lack of Pods: If your pea plants are growing well but not producing pods, it could be due to lack of pollination, high temperatures, or nutrient deficiency. Peas are self-pollinating, but you can help them along by gently shaking the plants. High temperatures can inhibit pod formation, so try to plant your peas early in the spring or late in the summer. Make sure your plants are getting enough phosphorus and potassium.
* Pest Infestations: As mentioned earlier, peas can be susceptible to pests like aphids and pea weevils. Inspect your plants regularly and take action if necessary.
Extending Your Pea Season
Want to enjoy fresh peas for longer? Here are a few tips for extending your pea season:
* Succession Planting: Plant new pea seeds every 2-3 weeks to ensure a continuous harvest.
* Choose Early and Late Varieties: Select pea varieties that mature at different times. This will help you spread out your harvest.
* Fall Planting: In milder climates, you can plant peas in the fall for a winter or early spring harvest.
* Preserving Your Harvest: If you have a bumper crop of peas, you can freeze them, can them, or dry them for later use.
My Personal Tips and Tricks
Over the years, I’ve learned a few extra tricks that have helped me grow even better peas:
* Inoculate Your Seeds: Before planting, consider inoculating your pea seeds with a nitrogen-fixing bacteria. This can help your plants absorb more nitrogen from the soil, resulting in healthier growth and higher yields. You can find inoculant at most garden centers.
* Use Companion Planting: Plant peas alongside other beneficial plants, such as carrots, radishes, and cucumbers. These plants can help deter pests and improve soil health.
* Mulch Your Plants: Apply a layer of mulch around your pea plants to help retain moisture, suppress weeds, and regulate soil temperature.
* Don’t Overcrowd: Give your pea plants enough space to grow. Overcrowding can lead to poor air circulation and increased risk of disease.
* Enjoy the Process! Growing peas is a rewarding experience. Take the time to enjoy the process and appreciate the fruits (or rather, vegetables!) of your labor.
Storing Your Harvest
Proper storage is key to keeping your freshly harvested peas at their best.
* Refrigerating Fresh Peas: If you plan to use your peas within a few days, store them in the refrigerator in a perforated plastic bag. This will help keep them crisp and fresh.
* Freezing Peas: For longer storage, freezing is a great option. Blanch the peas in boiling water for 2-3 minutes, then immediately transfer them to an ice bath to stop the cooking process
Conclusion
So, there you have it! Growing peas at home is not only achievable but also incredibly rewarding. From the crisp sweetness of freshly picked pods to the sheer joy of nurturing life from a tiny seed, this DIY project offers a unique connection to your food. Forget the bland, often-traveled peas from the supermarket; homegrown peas burst with flavor and are packed with nutrients.
This isn’t just about saving a few dollars; it’s about experiencing the satisfaction of self-sufficiency and enjoying a superior product. Imagine adding these vibrant green gems to your salads, stir-fries, or simply enjoying them straight from the vine as a healthy snack. The difference in taste and texture compared to store-bought varieties is truly remarkable.
But the benefits extend beyond the culinary. Growing peas is a fantastic way to introduce children to gardening, teaching them about the life cycle of plants and the importance of healthy eating. It’s also a therapeutic activity, providing a calming and grounding experience amidst the hustle and bustle of daily life.
Ready to take your pea-growing game to the next level? Consider these variations:
* **Succession Planting:** Plant new seeds every two to three weeks to ensure a continuous harvest throughout the growing season. This way, you’ll have a steady supply of fresh peas for your table.
* **Different Varieties:** Experiment with different pea varieties to discover your favorites. Snow peas, snap peas, and shelling peas each offer unique flavors and textures. Try ‘Sugar Snap’ for its crunchy pods or ‘Little Marvel’ for its early maturity.
* **Vertical Gardening:** If you’re short on space, grow your peas vertically using trellises, netting, or even repurposed materials like old ladders. This not only saves space but also improves air circulation and reduces the risk of disease.
* **Companion Planting:** Plant peas alongside beneficial companion plants like carrots, radishes, and cucumbers. These plants can help deter pests and improve soil health. Avoid planting peas near alliums like onions and garlic, as they can inhibit growth.
* **Soil Enrichment:** Before planting, amend your soil with compost or well-rotted manure to provide essential nutrients for healthy growth. Peas thrive in well-drained soil that is rich in organic matter.
We’re confident that you’ll find growing peas at home to be a delightful and fulfilling experience. Don’t be afraid to experiment, learn from your mistakes, and most importantly, have fun!
Now, we want to hear from you! Have you tried growing peas at home before? What tips and tricks have you learned along the way? Share your experiences, photos, and questions in the comments below. Let’s create a community of pea-growing enthusiasts and learn from each other. Your insights could be invaluable to other readers who are just starting out. So, grab your seeds, get your hands dirty, and embark on this exciting gardening adventure. Happy growing!
Frequently Asked Questions (FAQ)
What is the best time to plant peas?
The best time to plant peas is in early spring, as soon as the soil can be worked. Peas are a cool-season crop and thrive in temperatures between 60°F and 70°F (15°C and 21°C). In warmer climates, you can also plant peas in the fall for a winter harvest. Check your local frost dates to determine the optimal planting time for your region. Generally, you want to plant peas 4-6 weeks before the last expected frost.
How much sunlight do peas need?
Peas need at least 6-8 hours of sunlight per day to thrive. Choose a planting location that receives full sun for optimal growth and pod production. If you live in a particularly hot climate, some afternoon shade can be beneficial to prevent the plants from overheating.
What kind of soil is best for growing peas?
Peas prefer well-drained soil that is rich in organic matter. Amend your soil with compost or well-rotted manure before planting to improve drainage and fertility. The ideal soil pH for peas is between 6.0 and 7.0. Avoid planting peas in heavy clay soil, as this can lead to root rot.
Do peas need a trellis?
Most pea varieties, especially climbing varieties, benefit from a trellis or other support structure. This helps to keep the plants off the ground, improving air circulation and reducing the risk of disease. Trellises also make it easier to harvest the peas. Bush varieties may not require a trellis, but they can still benefit from some support to prevent the plants from sprawling.
How often should I water my pea plants?
Water your pea plants regularly, especially during dry periods. Keep the soil consistently moist, but avoid overwatering, as this can lead to root rot. Water deeply and less frequently, rather than shallowly and more often. Mulching around the plants can help to retain moisture in the soil.
What are some common pests and diseases that affect peas?
Common pests that affect peas include aphids, pea weevils, and slugs. Diseases that can affect peas include powdery mildew, fusarium wilt, and root rot. Monitor your plants regularly for signs of pests or diseases and take appropriate action if necessary. Organic pest control methods, such as insecticidal soap or neem oil, can be effective for controlling aphids and other pests. Ensure good air circulation and avoid overwatering to prevent fungal diseases.
How do I know when my peas are ready to harvest?
The timing of harvest depends on the variety of pea you are growing. Snow peas are ready to harvest when the pods are flat and the peas inside are just beginning to develop. Snap peas are ready when the pods are plump and the peas inside are fully formed but still tender. Shelling peas are ready when the pods are full and the peas inside are large and round. Harvest peas regularly to encourage continued production.
Can I save pea seeds for next year?
Yes, you can save pea seeds for next year. Allow some of the pods to dry completely on the vine. Once the pods are dry and brittle, shell the peas and store them in an airtight container in a cool, dry place. Be sure to label the container with the variety of pea and the date of harvest.
Are pea shoots edible?
Yes, pea shoots are edible and delicious! They have a mild, sweet flavor and can be used in salads, stir-fries, and other dishes. Harvest pea shoots when they are young and tender. Cutting the shoots back will also encourage the plant to produce more pods.
Why are my pea plants not producing pods?
There are several reasons why your pea plants may not be producing pods. These include:
* **Insufficient Sunlight:** Peas need at least 6-8 hours of sunlight per day to produce pods.
* **Poor Soil:** Peas need well-drained soil that is rich in organic matter.
* **Lack of Pollination:** While peas are self-pollinating, bees and other pollinators can help to improve pod set.
* **High Temperatures:** Peas do not thrive in hot weather.
* **Nutrient Deficiencies:** Peas need adequate levels of phosphorus and potassium to produce pods.
* **Pests or Diseases:** Pests and diseases can weaken the plants and reduce pod production.
By addressing these potential issues, you can improve your chances of a successful pea harvest.
Leave a Comment