

Growing Pink Radish at home might sound like a whimsical dream, but trust me, it’s easier than you think! Forget those bland, store-bought radishes; imagine plucking vibrant, peppery pink beauties straight from your own garden. For centuries, radishes have been a staple in diets across the globe, from ancient Egypt where they were a common food for laborers building the pyramids, to modern-day salads and snacks. Their quick growth and adaptability make them a rewarding crop for even the most novice gardener.
But why should you bother with this DIY project? Well, for starters, homegrown radishes taste infinitely better! Plus, you’ll know exactly what’s gone into them – no mystery chemicals or pesticides. And let’s be honest, there’s something incredibly satisfying about nurturing a plant from seed to table. I’m going to share some simple yet effective tricks and hacks that will have you growing pink radish like a pro in no time. Whether you have a sprawling backyard or just a sunny windowsill, get ready to add a splash of color and flavor to your life with this fun and easy gardening adventure!
Growing Gorgeous Pink Radishes: A DIY Guide for the Home Gardener
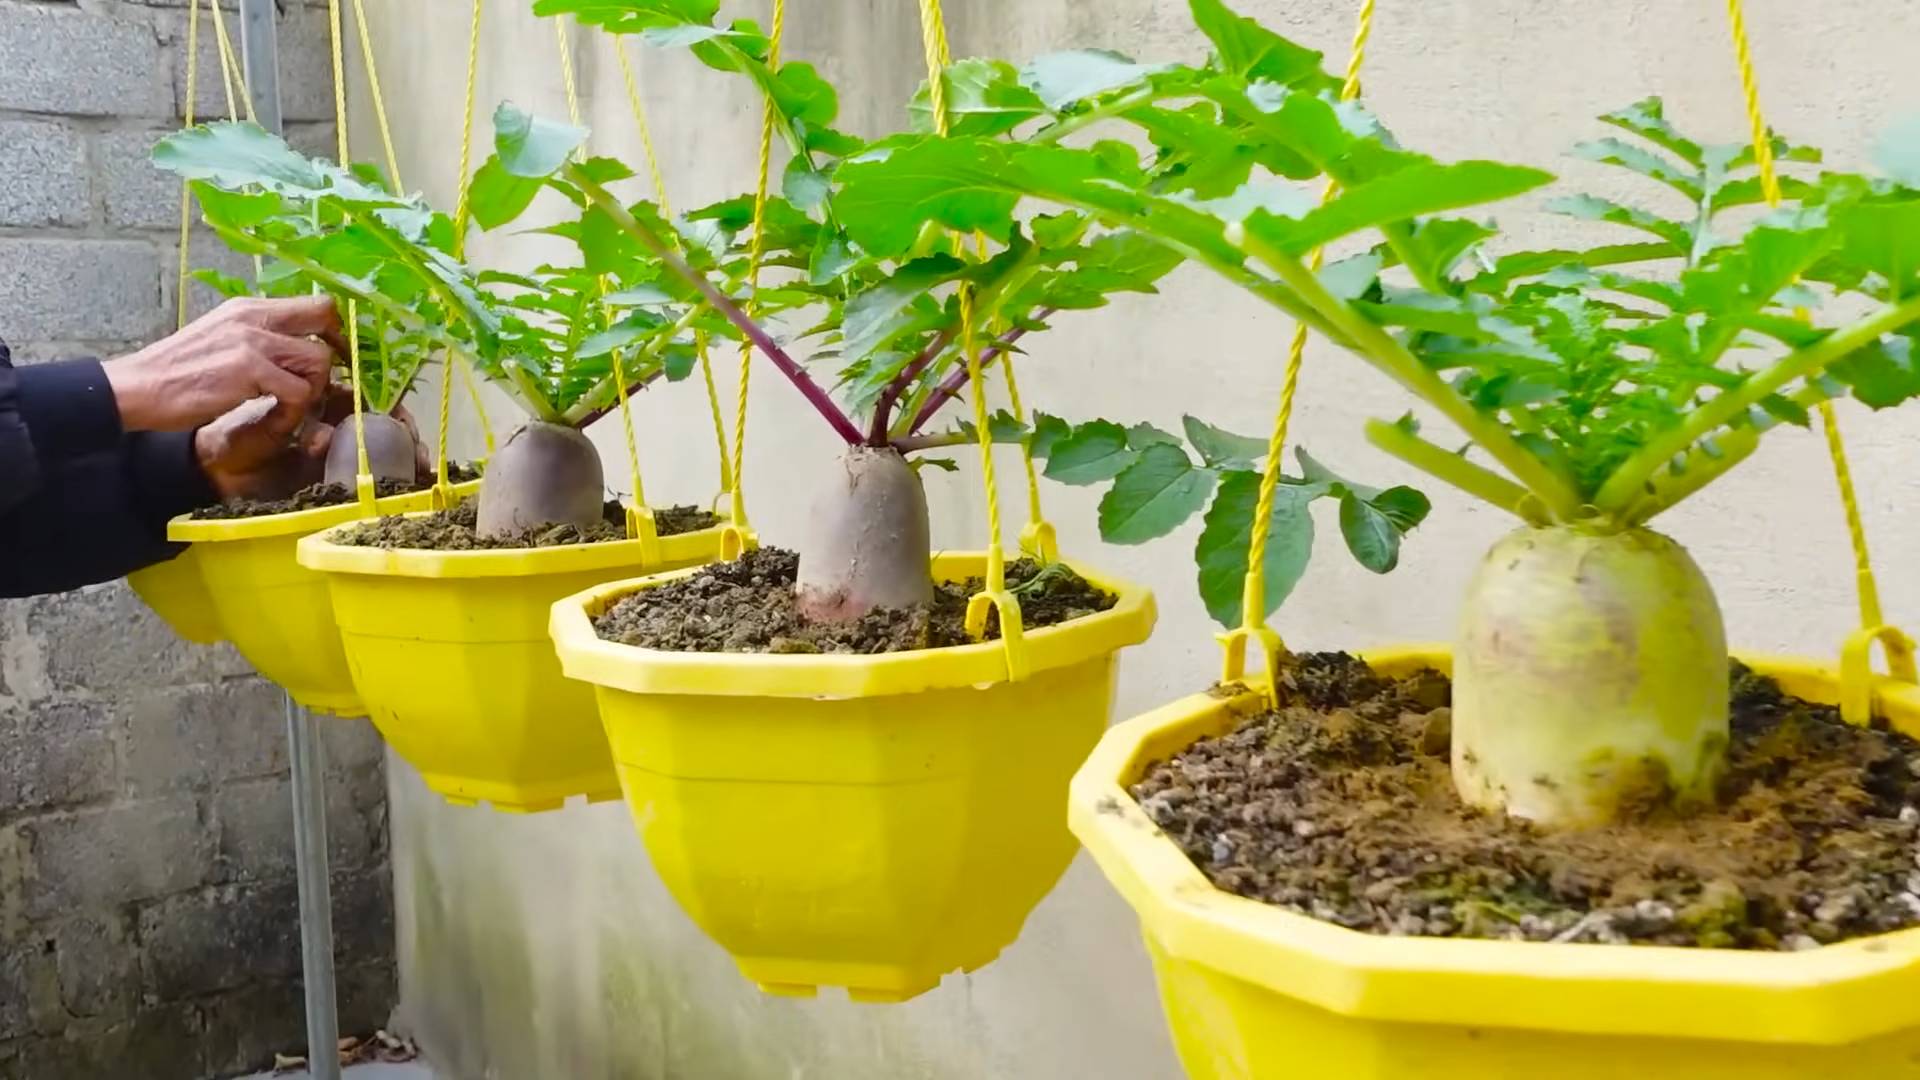
Okay, let’s get our hands dirty! I’m so excited to share my guide on growing those vibrant, peppy pink radishes right in your own backyard (or even on your balcony!). Radishes are super rewarding because they grow so quickly, making them perfect for impatient gardeners like me. Plus, that pop of pink adds a delightful touch to any salad or snack.
Choosing Your Pink Radish Variety
First things first, you need to pick the right radish! While many radishes are red, white, or even black, we’re after that beautiful pink hue. Here are a few varieties I’ve had success with:
- Pink Beauty: This is a classic choice! They’re known for their bright pink skin and mild flavor.
- French Breakfast: While technically bi-color (red and white), the pinkish-red top is prominent and beautiful. They have a slightly peppery taste.
- Easter Egg Blend: This is a mix of different colored radishes, including pink! It’s a fun option if you want a variety of colors in your harvest.
Preparing Your Radish Growing Area
Radishes are pretty low-maintenance, but a little prep work goes a long way.
- Sunlight: Radishes need at least 6 hours of sunlight per day. Choose a spot in your garden that gets plenty of sunshine.
- Soil: Well-drained soil is crucial. Radishes don’t like sitting in soggy soil. Amend your soil with compost or other organic matter to improve drainage and fertility. Aim for a slightly acidic to neutral pH (around 6.0 to 7.0).
- Container Gardening: If you’re growing in containers, choose pots that are at least 6 inches deep. Use a good quality potting mix.
Planting Your Pink Radish Seeds
Now for the fun part!
- Timing is Key: Radishes are cool-season crops, meaning they thrive in cooler temperatures. Plant them in early spring or late summer/early fall. Avoid planting during the hottest part of the summer, as they tend to bolt (go to seed) in the heat. I usually start planting about 4-6 weeks before the last expected frost in spring, and again in late August for a fall harvest.
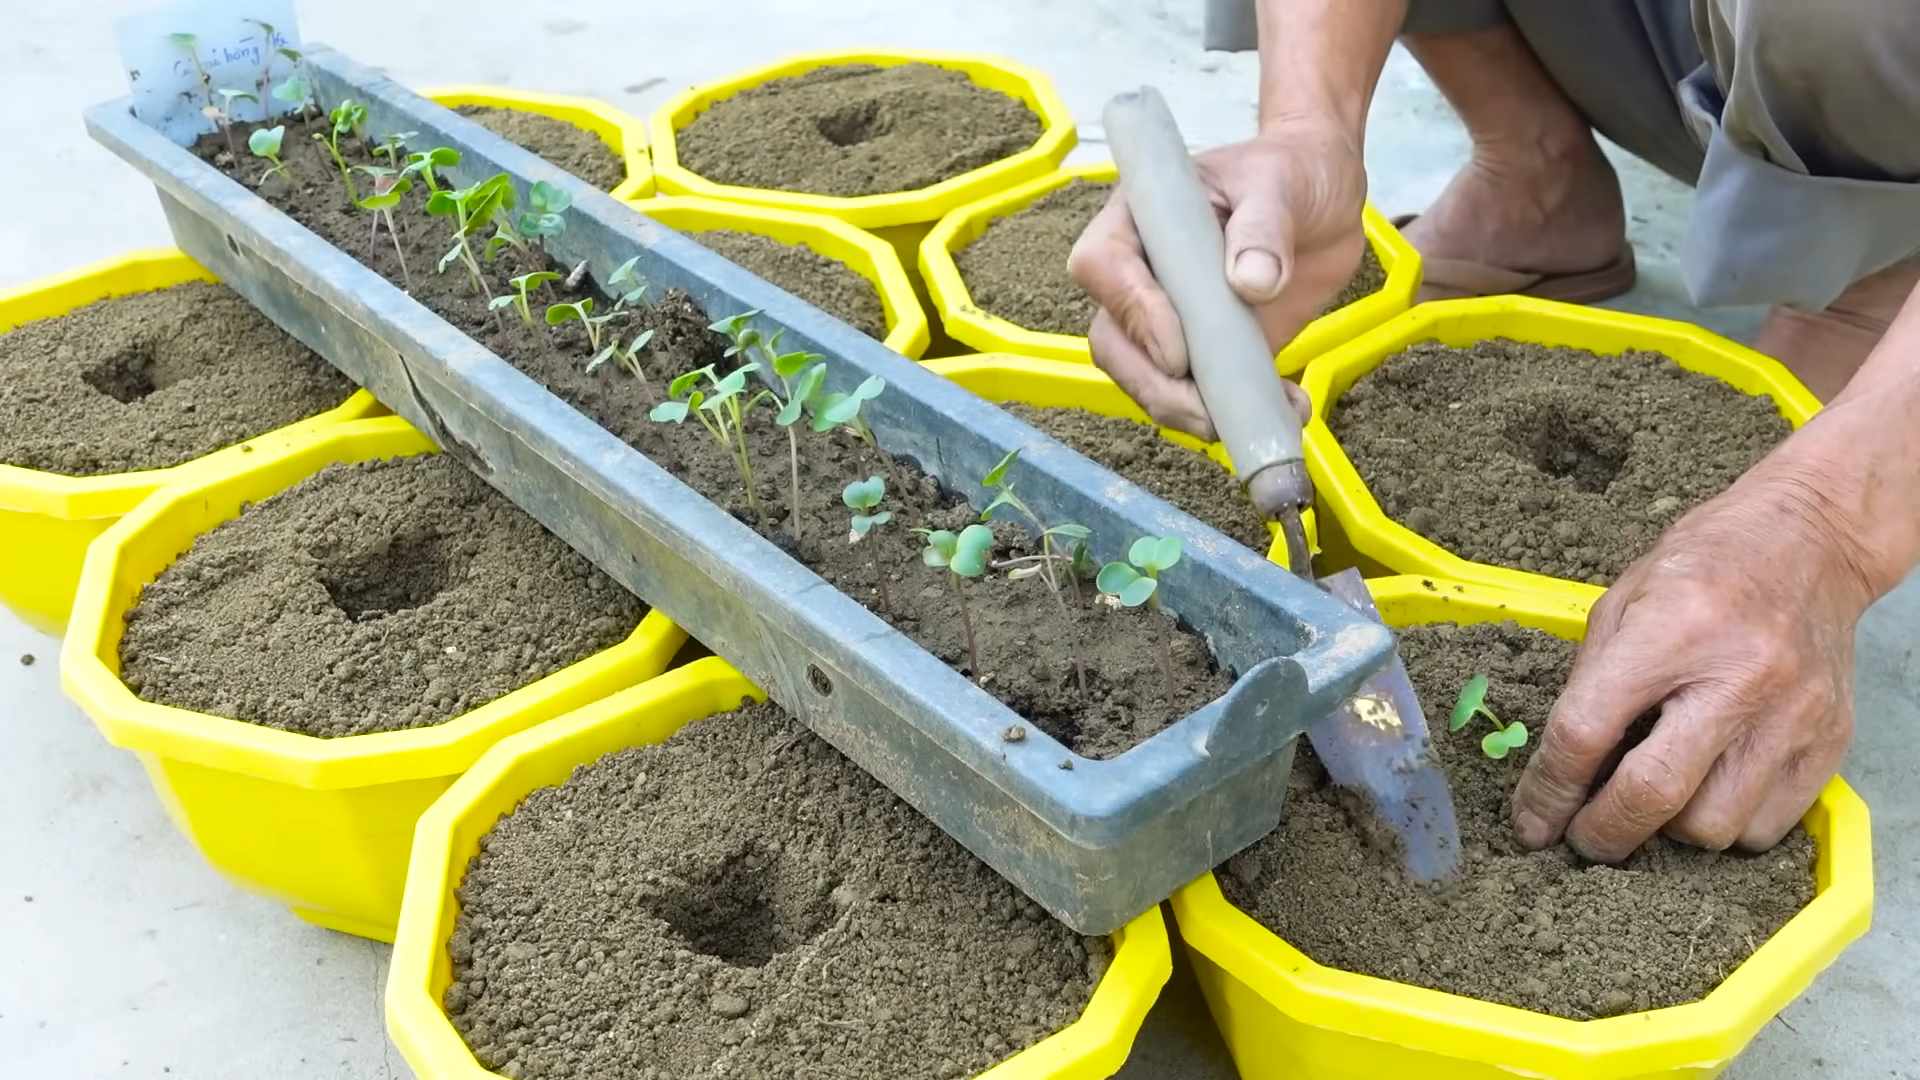
- Sowing the Seeds: Sow the seeds directly into the soil. Radishes don’t transplant well, so it’s best to plant them where they’ll grow. Make shallow furrows about 1/2 inch deep and 1 inch apart.
- Spacing: Sprinkle the seeds into the furrows, spacing them about 1 inch apart. You can always thin them later if they’re too crowded.
- Covering the Seeds: Gently cover the seeds with soil and lightly water the area.
- Watering: Keep the soil consistently moist, but not waterlogged. Radishes need consistent moisture to grow quickly and develop good flavor.
Caring for Your Radish Plants
Radishes are relatively easy to care for, but here are a few tips to keep them happy and healthy:
- Watering: As I mentioned before, consistent watering is key. Check the soil moisture regularly and water when the top inch feels dry.
- Thinning: Once the seedlings emerge and have a few true leaves, thin them to about 2 inches apart. This will give them enough space to grow. Don’t just pull them out! Gently loosen the soil around the seedlings you want to remove and carefully lift them out. You can even transplant these thinned seedlings to another area of your garden if you have space.
- Weeding: Keep the area around your radishes free of weeds. Weeds compete with the radishes for nutrients and water. Hand-pull weeds carefully to avoid disturbing the radish roots.
- Fertilizing: Radishes don’t need a lot of fertilizer. If your soil is poor, you can side-dress them with a balanced fertilizer a few weeks after they emerge. I prefer using compost tea or a diluted fish emulsion.
- Pest Control: Radishes are generally pest-resistant, but they can sometimes be bothered by flea beetles or root maggots. Flea beetles chew small holes in the leaves. You can control them with insecticidal soap or by covering your plants with row covers. Root maggots are small white larvae that feed on the roots. You can prevent them by practicing crop rotation and by using row covers.
Harvesting Your Pink Radishes
This is the most exciting part! Radishes are ready to harvest in as little as 3-4 weeks after planting.
- Check for Size: Radishes are usually ready to harvest when they are about 1 inch in diameter. Gently brush away the soil around the base of the radish to check its size.
- Pulling the Radishes: To harvest, simply grasp the radish greens near the base and gently pull the radish out of the soil. If the soil is dry, you may need to loosen it first with a trowel.
- Washing and Storing: Wash the radishes thoroughly to remove any dirt. Trim off the greens, leaving about 1/2 inch of stem. Store the radishes in a plastic bag in the refrigerator. They will keep for about a week.
Troubleshooting Common Radish Problems
Even with the best care, sometimes things can go wrong. Here are a few common radish problems and how to fix them:
- Radishes are too spicy: This is often caused by hot weather or inconsistent watering. Make sure to water your radishes regularly and harvest them before they get too large.
- Radishes are small and stunted: This can be caused by poor soil, overcrowding, or lack of sunlight. Amend your soil with compost, thin your plants, and make sure they are getting enough sunlight.
- Radishes are bolting (going to seed): This is usually caused by hot weather or stress. Try to plant your radishes during cooler weather and provide them with consistent moisture.
- Radishes are splitting: This is often caused by inconsistent watering. Make sure to water your radishes regularly, especially during dry spells.
Using Your Homegrown Pink Radishes
Now that you’ve harvested your beautiful pink radishes, it’s time to enjoy them! Here are a few of my favorite ways to use them:
- Salads: Thinly sliced radishes add a peppery crunch to any salad.
- Snacks: Serve radishes with butter and salt for a simple and delicious snack.
- Pickled Radishes: Pickled radishes are a tangy and flavorful condiment.
- Radish Greens: Don’t throw away the radish greens! They are edible and can be used in salads, soups, or stir-fries. They have a slightly peppery flavor, similar to arugula.
- Radish Butter: Mix finely grated radishes with softened butter and herbs for a flavorful spread.
Extra Tips for Radish Success
Here are a few extra tips that I’ve learned over the years:
- Succession Planting: Plant a new batch of radishes every 2 weeks for a continuous harvest.
- Companion Planting: Radishes are good companion plants for carrots, lettuce, and spinach.
- Don’t Overwater: While consistent moisture is important, avoid overwatering, as this can lead to root rot.
- Harvest Promptly: Radishes are best when they are young and tender. Harvest them as soon as they are ready to avoid them becoming too spicy or woody.
Growing your own pink radishes is a fun and rewarding experience. With a little bit of care and attention, you can enjoy a bountiful harvest of these delicious and beautiful vegetables. Happy gardening!
Conclusion
So, there you have it! Growing pink radishes at home is not only surprisingly simple but also incredibly rewarding. Forget those bland, store-bought radishes that lack that vibrant peppery punch. With this easy DIY trick, you can cultivate your own crop of crisp, colorful, and intensely flavorful pink radishes right in your backyard or even on your balcony.
Why is this a must-try? Because freshness matters. Radishes, unlike some vegetables, are best enjoyed soon after harvest. The longer they sit, the milder their flavor becomes. By growing your own, you’re guaranteeing the freshest, most flavorful radishes possible. Plus, there’s something deeply satisfying about nurturing a plant from seed to table. It connects you to your food in a way that simply buying it from the store never can.
But the benefits don’t stop there. Growing your own pink radishes allows you to control the entire process, ensuring that your radishes are grown organically, free from harmful pesticides and herbicides. You know exactly what’s going into your food, giving you peace of mind and a healthier harvest.
Looking for variations? Absolutely! Experiment with different radish varieties. While we’ve focused on pink radishes, there are countless other colors and shapes to explore, from the classic red globe to the elongated French Breakfast radish. You can also try interplanting your radishes with other vegetables, such as carrots or lettuce. Radishes are fast growers and can help break up the soil for slower-growing plants. Another fun variation is to pickle your radishes for a tangy and refreshing snack. Or, roast them with a drizzle of olive oil and herbs for a surprisingly delicious side dish. Don’t forget that radish greens are edible too! Sauté them with garlic and olive oil for a nutritious and flavorful addition to any meal.
This DIY radish growing method is a game-changer for anyone who loves fresh, flavorful produce. It’s a simple, cost-effective, and incredibly rewarding way to add a touch of homegrown goodness to your meals.
We wholeheartedly encourage you to give this DIY trick a try. Whether you’re a seasoned gardener or a complete beginner, you’ll be amazed at how easy it is to grow your own pink radishes. And once you’ve tasted the difference between homegrown and store-bought, you’ll never go back.
So, grab some seeds, prepare your soil, and get ready to experience the joy of growing your own pink radishes. We can’t wait to hear about your experiences! Share your photos, tips, and tricks in the comments below. Let’s build a community of radish enthusiasts and spread the word about the joys of homegrown produce. Happy gardening!
Frequently Asked Questions (FAQ)
Q: How long does it take to grow pink radishes?
A: One of the best things about radishes is their quick growth cycle! Generally, you can expect to harvest your pink radishes in as little as 3-4 weeks from planting the seeds. The exact time can vary slightly depending on the specific variety of radish, the soil conditions, and the weather. Warmer temperatures tend to speed up the growth process, while cooler temperatures may slow it down a bit. Keep an eye on the radish roots near the soil surface; when they reach about an inch in diameter, they’re usually ready to harvest.
Q: What kind of soil is best for growing pink radishes?
A: Radishes thrive in loose, well-drained soil that is rich in organic matter. Heavy clay soil can hinder their growth and result in misshapen or stunted radishes. Before planting, amend your soil with compost or well-rotted manure to improve its drainage and fertility. A slightly acidic to neutral soil pH (around 6.0 to 7.0) is ideal. If you’re unsure about your soil’s pH, you can easily test it with a home soil testing kit.
Q: How much sunlight do pink radishes need?
A: Radishes are relatively low-maintenance when it comes to sunlight. They need at least 6 hours of sunlight per day, but they can tolerate partial shade, especially in hotter climates. If you’re growing radishes in a very sunny location, providing some afternoon shade can help prevent them from bolting (going to seed prematurely), which can make the roots tough and bitter.
Q: How often should I water my pink radishes?
A: Consistent moisture is crucial for growing plump, juicy radishes. Water your radishes regularly, especially during dry spells. Aim to keep the soil consistently moist but not waterlogged. Overwatering can lead to root rot, while underwatering can cause the radishes to become small and tough. A good rule of thumb is to water deeply whenever the top inch of soil feels dry to the touch.
Q: Can I grow pink radishes in containers?
A: Absolutely! Radishes are excellent candidates for container gardening. Choose a container that is at least 6 inches deep and has drainage holes. Fill it with a good-quality potting mix and follow the same planting and care instructions as you would for growing radishes in the ground. Container-grown radishes may need more frequent watering than those grown in the ground, as the soil in containers tends to dry out more quickly.
Q: What are some common pests and diseases that affect pink radishes?
A: While radishes are generally pest-resistant, they can occasionally be affected by flea beetles, root maggots, or aphids. Flea beetles can chew small holes in the leaves, while root maggots can damage the roots. Aphids can suck the sap from the plants, weakening them. To prevent these pests, consider using row covers or insecticidal soap. Diseases are less common in radishes, but they can sometimes be susceptible to fungal diseases like damping-off or white rust. Ensure good air circulation and avoid overwatering to prevent these diseases.
Q: Why are my pink radishes cracking?
A: Cracking in radishes is often caused by inconsistent watering. If the soil dries out completely and then is suddenly saturated with water, the radishes can grow too quickly, causing the skin to crack. To prevent cracking, maintain consistent soil moisture and avoid letting the soil dry out completely between waterings.
Q: Why are my pink radishes so spicy?
A: The spiciness of radishes is influenced by several factors, including the variety, the growing conditions, and the age of the radish. Radishes grown in hot, dry conditions tend to be spicier than those grown in cooler, moister conditions. Also, radishes that are left in the ground for too long can become overly spicy. To reduce the spiciness, harvest your radishes when they are young and tender, and provide them with consistent moisture.
Q: Can I eat the radish greens?
A: Yes, absolutely! Radish greens are perfectly edible and quite nutritious. They have a slightly peppery flavor similar to the radish root. You can use them in salads, soups, stir-fries, or as a garnish. Just be sure to wash them thoroughly before using them.
Q: How do I store pink radishes after harvesting?
A: To store your harvested pink radishes, remove the greens (leaving about an inch of stem) and wash the radishes thoroughly. Place them in a plastic bag or container lined with a damp paper towel and store them in the refrigerator. They should keep for up to a week.
Leave a Comment