

Growing Shallots at Home can seem daunting, but trust me, it’s easier than you think! Have you ever dreamt of snipping fresh, flavorful shallots right from your backyard, adding that gourmet touch to your dishes without a trip to the grocery store? Well, dream no more! This article is your ultimate guide to unlocking the secrets of cultivating these culinary gems right in your own garden.
Shallots, with their delicate onion-garlic flavor, have been prized for centuries. Originating in Central or Southwest Asia, they’ve journeyed across continents, becoming a staple in cuisines worldwide. From French sauces to Asian stir-fries, shallots add a depth of flavor that’s simply irresistible. But why rely on store-bought shallots when you can easily grow your own, bursting with freshness and flavor?
In today’s world, where we’re all striving for sustainability and healthier eating, growing shallots at home offers a fantastic way to connect with nature and control the quality of your food. Plus, it’s incredibly rewarding to nurture something from bulb to table! Whether you’re a seasoned gardener or a complete beginner, I’m here to share simple, effective DIY tricks and hacks that will have you harvesting a bountiful crop of shallots in no time. Let’s get our hands dirty and embark on this exciting gardening adventure together!
Growing Shallots at Home: A Beginner’s Guide
Alright, shallot enthusiasts! Ever dreamt of snipping fresh shallots right from your own garden? Well, dream no more! Growing shallots at home is surprisingly easy and rewarding. I’m going to walk you through everything you need to know, from choosing the right shallots to harvesting your flavorful bounty. Let’s get started!
Choosing Your Shallots
First things first, you need to decide what kind of shallots you want to grow. There are a few different varieties, each with its own unique flavor profile.
* French Red Shallots: These are probably the most common type. They have a beautiful reddish-purple skin and a mild, sweet flavor. I personally love using them in vinaigrettes and sauces.
* Yellow Shallots: These have a golden-brown skin and a slightly stronger, more pungent flavor than the French Red variety. They’re great for cooking and adding depth to dishes.
* Gray Shallots (Griselle): These are considered by many to be the most flavorful shallots. They have a grayish skin and a rich, complex flavor that’s perfect for gourmet cooking. They can be a bit harder to find, but they’re definitely worth the effort.
You can buy shallot sets (small, immature bulbs) from your local garden center or online. Make sure the bulbs are firm and healthy, with no signs of mold or rot. Avoid shallots that are soft or sprouting prematurely.
Preparing Your Garden Bed
Shallots need well-drained soil and plenty of sunlight to thrive. Choose a spot in your garden that gets at least 6 hours of direct sunlight per day.
* Soil Preparation: Shallots prefer loose, fertile soil. Before planting, amend your soil with plenty of compost or well-rotted manure. This will improve drainage and provide your shallots with the nutrients they need. I usually dig in about 2-3 inches of compost.
* pH Level: Shallots prefer a slightly acidic to neutral soil pH (around 6.0 to 7.0). You can test your soil pH with a simple soil testing kit from your local garden center. If your soil is too acidic, you can add lime to raise the pH.
* Weed Removal: Make sure to remove any weeds from your planting area. Weeds can compete with your shallots for nutrients and water. I like to use a hoe to gently remove weeds without disturbing the soil too much.
Planting Your Shallots
The best time to plant shallots is in the fall (September-November) in milder climates, or early spring (February-April) in colder climates. Planting in the fall allows the shallots to establish roots before winter, resulting in a larger harvest the following summer.
1. Spacing: Plant your shallot bulbs about 6-8 inches apart in rows that are 12-18 inches apart. This will give them enough room to grow and mature.
2. Depth: Plant the bulbs with the pointed end facing up, just barely covered with soil. You should only see the very tip of the bulb peeking out. I usually aim for about an inch of soil covering the bulb.
3. Watering: After planting, water your shallots thoroughly. This will help settle the soil and encourage root growth.
4. Mulching: Apply a layer of mulch around your shallots to help retain moisture, suppress weeds, and regulate soil temperature. I like to use straw or shredded leaves as mulch.
Caring for Your Shallots
Shallots are relatively low-maintenance plants, but they do need some basic care to thrive.
* Watering: Water your shallots regularly, especially during dry periods. They need about 1 inch of water per week. Avoid overwatering, as this can lead to rot. I usually check the soil moisture before watering – if the top inch of soil is dry, it’s time to water.
* Fertilizing: Fertilize your shallots every few weeks with a balanced fertilizer. I like to use a liquid fertilizer diluted to half strength. Avoid over-fertilizing, as this can lead to excessive foliage growth at the expense of bulb development.
* Weeding: Keep your shallot bed free of weeds. Weeds can compete with your shallots for nutrients and water. I usually hand-weed my shallot bed every week or two.
* Pest and Disease Control: Shallots are generally resistant to pests and diseases, but they can be susceptible to onion maggots and fungal diseases. If you notice any signs of pests or diseases, treat them promptly with an appropriate insecticide or fungicide. I prefer to use organic pest control methods whenever possible.
Harvesting Your Shallots
Shallots are typically ready to harvest in the summer, about 90-120 days after planting.
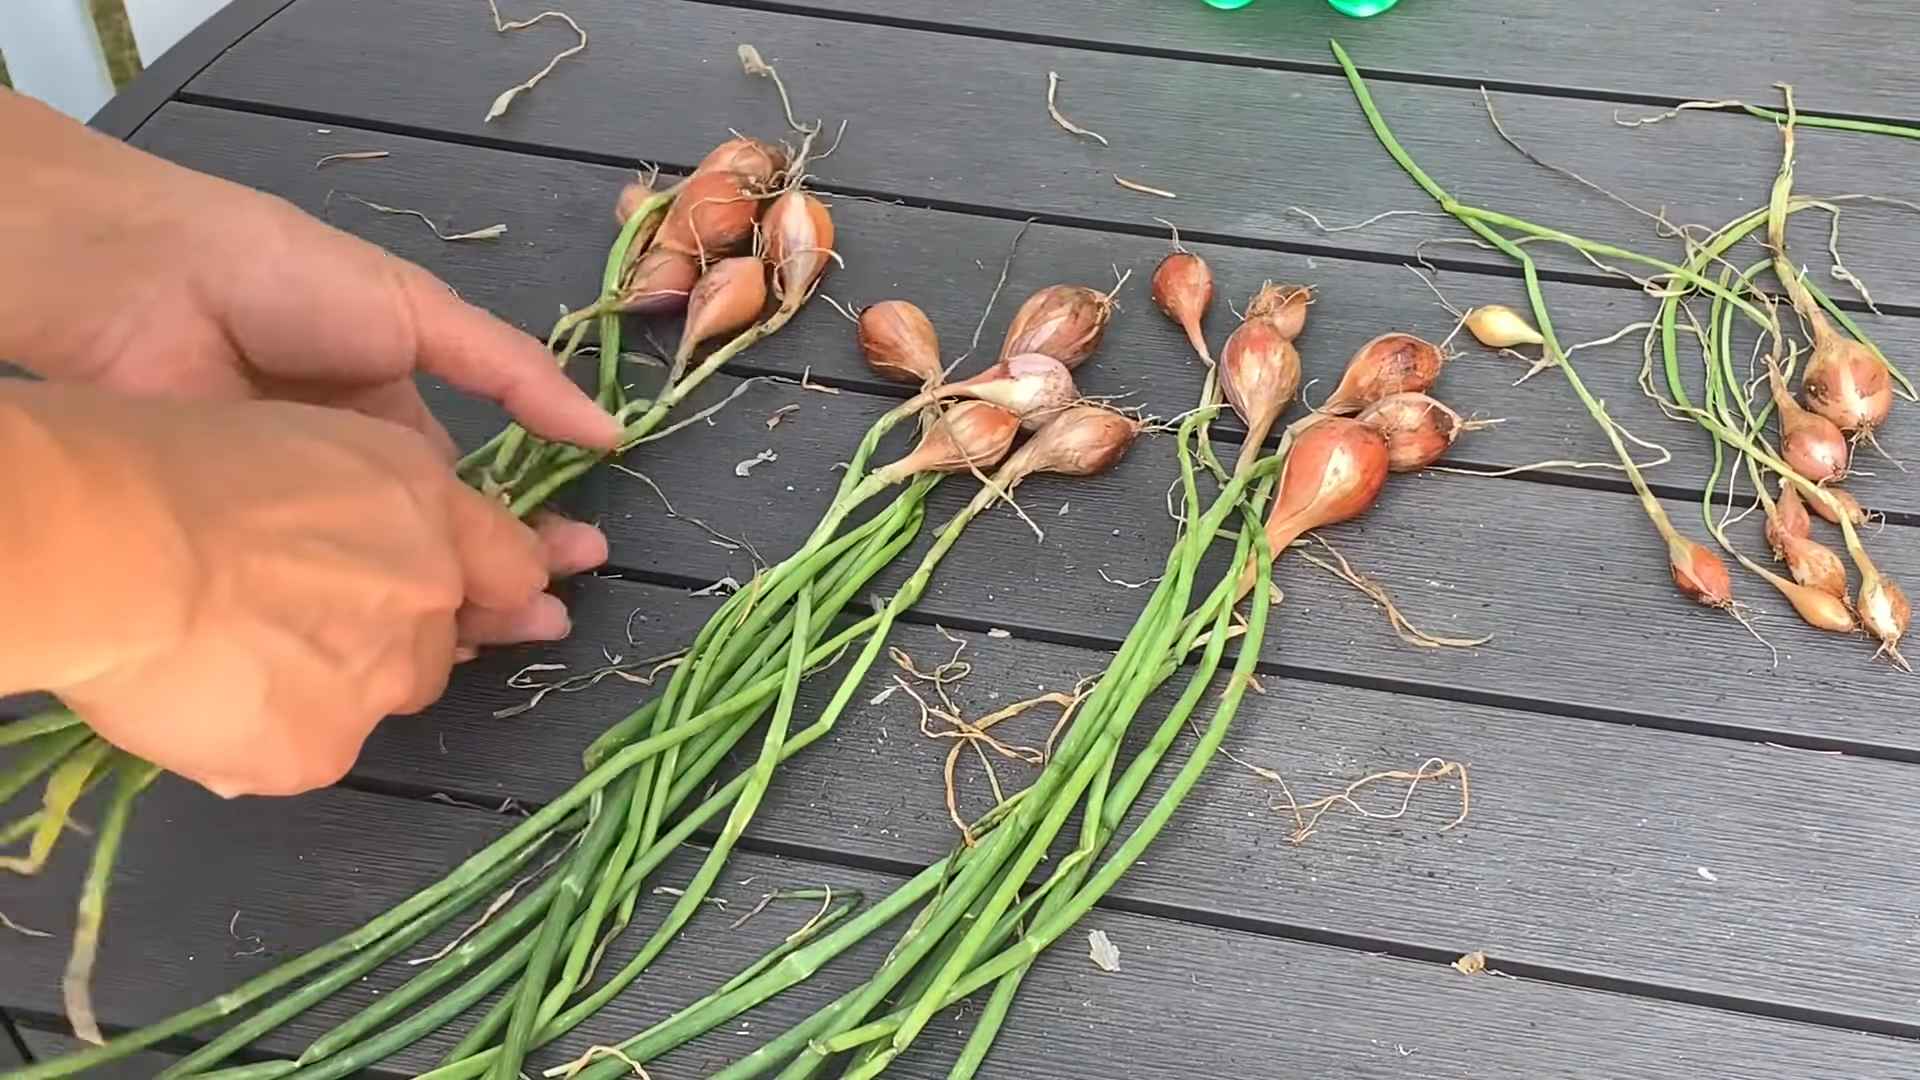
1. Signs of Maturity: The leaves will start to turn yellow and brown, and the bulbs will begin to emerge from the soil. This is a sign that your shallots are ready to harvest.
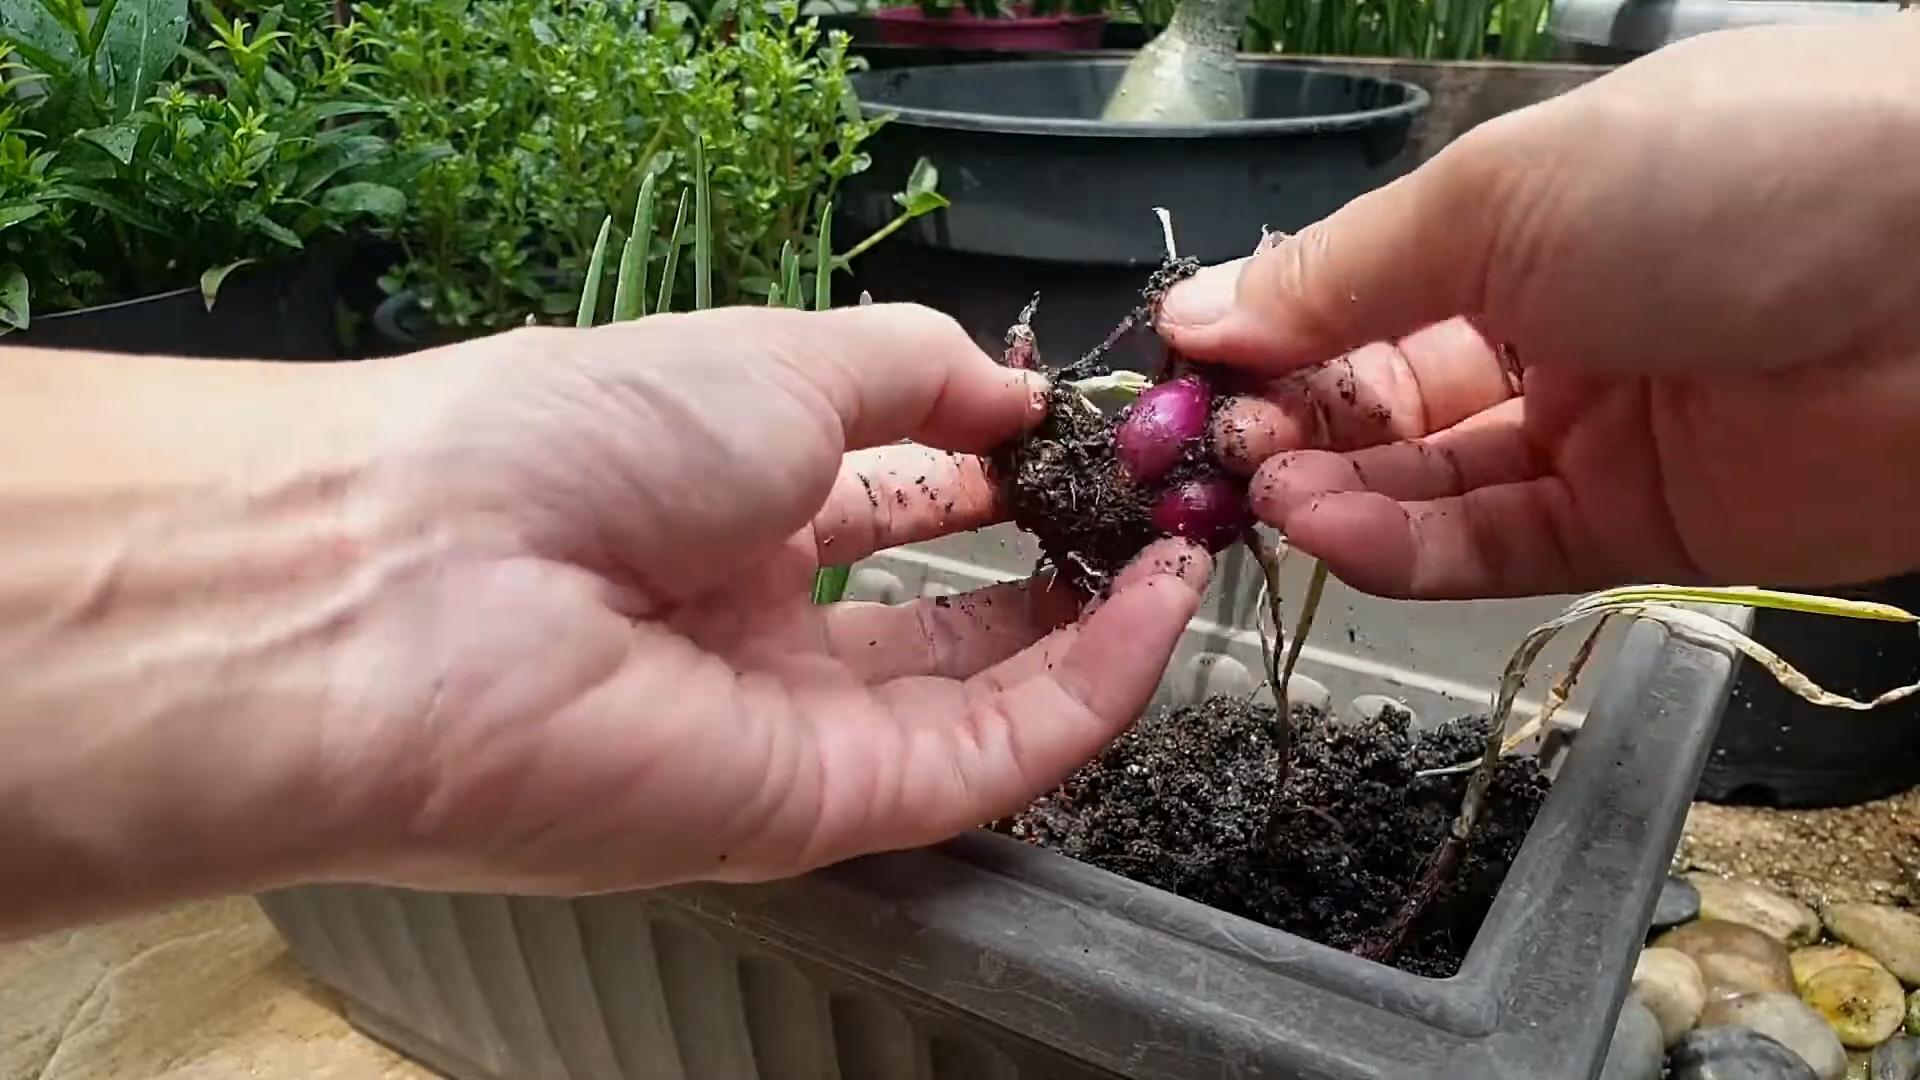
2. Harvesting Technique: Gently loosen the soil around the shallots with a garden fork. Then, carefully pull the bulbs from the soil.
3. Curing: After harvesting, cure your shallots in a warm, dry place for about 2-3 weeks. This will help them to dry out and develop a stronger flavor. I usually spread them out on a screen or in a well-ventilated basket.
4. Storage: Store your cured shallots in a cool, dry, and dark place. They should keep for several months. I like to store mine in a mesh bag in the pantry.
Troubleshooting
Even with the best care, you might encounter a few challenges when growing shallots. Here are some common problems and how to fix them:
* Yellowing Leaves: This could be a sign of overwatering, underwatering, or nutrient deficiency. Check the soil moisture and fertilize your shallots if necessary.
* Small Bulbs: This could be due to overcrowding, poor soil, or insufficient sunlight. Thin out your shallots if they are too close together, amend your soil with compost, and make sure they are getting enough sunlight.
* Rotting Bulbs: This is usually caused by overwatering or poor drainage. Make sure your soil is well-drained and avoid overwatering.
* Pest Infestation: If you notice any signs of pests, treat them promptly with an appropriate insecticide.
Using Your Homegrown Shallots
Now for the best part – enjoying the fruits (or rather, bulbs!) of your labor! Shallots are incredibly versatile and can be used in a wide variety of dishes.
* Raw: Finely chopped shallots add a delicious bite to salads, vinaigrettes, and salsas.
* Cooked: Shallots can be sautéed, roasted, grilled, or caramelized. They add a rich, savory flavor to soups, stews, sauces, and stir-fries.
* Pickled: Pickled shallots are a tangy and flavorful condiment that can be used to top sandwiches, salads, and tacos.
Here are a few of my favorite ways to use homegrown shallots:
* Shallot Vinaigrette: Whisk together finely chopped shallots, olive oil, vinegar, Dijon mustard, and a pinch of salt and pepper.
* Caramelized Shallots: Slowly cook sliced shallots in butter until they are soft, sweet, and golden brown.
* Shallot and Herb Butter: Mix softened butter with finely chopped shallots, fresh herbs, and a pinch of salt.
Propagating Shallots
Shallots are perennials, which means they can be grown year after year. You can propagate shallots by dividing the bulbs.
1. Dividing: In the fall, after harvesting your shallots, carefully separate the individual bulbs from the cluster.
2. Replanting: Replant the individual bulbs as you would with new shallot sets.
3. Enjoy: And that’s it! You’ll have a new crop of shallots the following summer.
Shallot Scape Pesto
Don’t forget about the scapes! Just like garlic, shallots produce scapes, which are the flower stalks. These scapes have a mild oniony flavor and can be used in a variety of dishes. One of my favorite ways to use shallot scapes is to make pesto.
Ingredients:
* 1 cup shallot scapes, chopped
* 1/2 cup grated Parmesan cheese
* 1/4 cup pine nuts
* 1/4 cup olive oil
* 2 cloves garlic, minced
* Salt and pepper to taste
Instructions:
1. Combine the shallot scapes, Parmesan cheese, pine nuts, garlic, salt, and pepper in a food processor.
2. Pulse until finely chopped.
3. With the food processor running, slowly drizzle in the olive oil until the pesto is smooth and creamy.
4. Taste and adjust seasonings as needed.
5.
Conclusion
So, there you have it! Growing shallots at home is not only surprisingly easy, but it’s also incredibly rewarding. Imagine the satisfaction of harvesting your own fresh, flavorful shallots, knowing exactly where they came from and how they were grown. Forget those bland, store-bought shallots that have been sitting on shelves for who knows how long. With just a little effort and attention, you can cultivate a continuous supply of these culinary gems right in your own backyard, balcony, or even on a sunny windowsill.
This DIY trick for growing shallots offers a multitude of benefits. You’ll save money, reduce your reliance on grocery stores, and gain a deeper connection to the food you eat. Plus, the taste of homegrown shallots is simply unmatched. They boast a more intense and nuanced flavor profile than their commercially grown counterparts, adding a delightful depth to your favorite dishes.
But the advantages don’t stop there. Growing your own shallots is also a sustainable and environmentally friendly practice. You’ll be reducing your carbon footprint by eliminating the need for transportation and packaging. And by using organic gardening methods, you can avoid harmful pesticides and herbicides, ensuring that your shallots are healthy and safe for you and your family.
Ready to take your shallot-growing game to the next level? Consider experimenting with different varieties of shallots to discover your personal favorites. From the classic French Grey shallot to the robust Dutch Yellow shallot, there’s a whole world of flavors waiting to be explored. You can also try companion planting shallots with other vegetables and herbs to create a thriving and mutually beneficial garden ecosystem. Carrots, beets, and chamomile are all excellent companions for shallots, helping to deter pests and improve soil health.
Don’t be afraid to get creative with your shallot cultivation techniques. Try growing them in raised beds, containers, or even vertical gardens to maximize your space and create a visually appealing display. You can also experiment with different mulching materials to conserve moisture, suppress weeds, and enrich the soil.
Ultimately, the key to successful shallot growing is to be patient, observant, and willing to learn from your mistakes. Every garden is unique, and what works for one person may not work for another. So, don’t be discouraged if you encounter challenges along the way. Embrace the learning process and enjoy the journey of growing your own food.
We wholeheartedly encourage you to give this DIY trick a try. It’s a simple, affordable, and incredibly rewarding way to enhance your culinary creations and connect with nature. Once you’ve experienced the joy of harvesting your own homegrown shallots, you’ll never want to go back to store-bought ones again.
And most importantly, we want to hear about your experiences! Share your tips, tricks, and triumphs in the comments below. Let us know what varieties of shallots you’re growing, what challenges you’ve faced, and what delicious dishes you’ve created with your homegrown harvest. Together, we can build a community of passionate shallot growers and inspire others to embrace the joys of gardening. So, get your hands dirty, plant some shallots, and let the growing begin! This **DIY shallot** growing method is a game changer.
Frequently Asked Questions (FAQ)
Q: How long does it take to grow shallots from sets?
A: Generally, it takes about 90-120 days from planting shallot sets to harvest. The exact time can vary depending on the variety of shallot, the climate, and the growing conditions. You’ll know they’re ready when the green tops start to turn yellow and fall over. This indicates that the bulbs have matured and are ready to be harvested. Don’t wait too long, or the bulbs may start to rot in the ground.
Q: Can I grow shallots from seed instead of sets?
A: Yes, you can grow shallots from seed, but it’s a much longer process. It typically takes two years to get a good-sized bulb when starting from seed. In the first year, you’ll grow small, immature bulbs. These bulbs can then be planted in the second year to produce full-sized shallots. Growing from sets is generally preferred because it’s faster and more reliable. However, if you’re looking for a specific variety that’s not available as sets, growing from seed may be your only option.
Q: What kind of soil is best for growing shallots?
A: Shallots prefer well-drained, fertile soil with a pH between 6.0 and 7.0. Amend your soil with compost or other organic matter before planting to improve drainage and fertility. Avoid heavy clay soils, as they can become waterlogged and lead to bulb rot. If you have clay soil, consider growing your shallots in raised beds or containers.
Q: How often should I water my shallots?
A: Water your shallots regularly, especially during dry periods. Aim to keep the soil consistently moist, but not waterlogged. Overwatering can lead to bulb rot, so it’s important to strike a balance. Water deeply and less frequently, rather than shallowly and more often. A good rule of thumb is to water when the top inch of soil feels dry to the touch.
Q: What are some common pests and diseases that affect shallots?
A: Common pests that can affect shallots include onion thrips, onion maggots, and aphids. Diseases include downy mildew, white rot, and botrytis leaf blight. To prevent pest and disease problems, practice good garden hygiene, such as removing plant debris and weeds. You can also use organic pest control methods, such as insecticidal soap or neem oil. Ensure proper spacing between plants to promote good air circulation and reduce the risk of fungal diseases.
Q: Can I grow shallots in containers?
A: Absolutely! Shallots are well-suited for container gardening. Choose a pot that is at least 6 inches deep and wide to allow the bulbs to develop properly. Use a well-draining potting mix and water regularly. Place the container in a sunny location that receives at least 6 hours of sunlight per day. Container-grown shallots may require more frequent watering and fertilization than those grown in the ground.
Q: How do I store shallots after harvesting?
A: After harvesting, cure your shallots by laying them out in a warm, dry, and well-ventilated place for about two weeks. This allows the outer layers of the bulbs to dry and harden, which helps to prevent rot. Once cured, store your shallots in a cool, dry, and dark place, such as a pantry or cellar. Properly stored shallots can last for several months. Avoid storing them in the refrigerator, as this can cause them to sprout or become soft.
Q: Can I eat the green tops of shallots?
A: Yes, the green tops of shallots are edible and have a mild onion-like flavor. You can use them in salads, soups, and other dishes as a substitute for chives or green onions. Harvest the green tops as needed throughout the growing season, but be careful not to remove too many at once, as this can weaken the plant.
Q: What are some good companion plants for shallots?
A: Shallots benefit from being planted near certain companion plants. Carrots and shallots are a classic pairing, as the shallots deter carrot root flies, and the carrots deter onion flies. Other good companions include beets, chamomile, rosemary, and thyme. Avoid planting shallots near beans or peas, as they can inhibit each other’s growth.
Q: How do I know when it’s time to harvest my shallots?
A: The best time to harvest shallots is when the green tops start to turn yellow and fall over. This indicates that the bulbs have matured and are ready to be harvested. Gently dig up the bulbs with a garden fork, being careful not to damage them. Brush off any excess soil and allow them to cure before storing.

Leave a Comment