

Laundry room deep cleaning: it’s the chore we all dread, isn’t it? But what if I told you that transforming your laundry room from a chaotic clutter zone into a sparkling, efficient space is not only achievable but also surprisingly satisfying? For generations, laundry spaces, whether humble washhouses or modern rooms, have been the unsung heroes of our homes, silently battling stains and odors. Think about it – our grandmothers likely spent hours scrubbing clothes by hand, a far cry from our automated machines.
Today, we have it easier, but the laundry room still deserves our attention. Over time, lint, detergent residue, and general grime accumulate, creating a breeding ground for bacteria and impacting the efficiency of our appliances. That’s why a thorough laundry room deep cleaning is essential, not just for aesthetics but also for the health and longevity of your machines. This DIY guide will provide you with simple yet effective tricks and hacks to revitalize your laundry room, making laundry day less of a burden and more of a breeze. I’m excited to share these tips with you, so let’s get started!
DIY Laundry Room Deep Clean: From Grime to Gleam!
Okay, friends, let’s face it: the laundry room is often the forgotten corner of the house. We shove clothes in, pull them out, and rarely give it the TLC it deserves. But a clean laundry room isn’t just about aesthetics; it’s about efficiency, hygiene, and making laundry day a little less dreadful. So, grab your gloves, crank up the tunes, and let’s dive into a deep clean that will transform your laundry space!
Gather Your Supplies
Before we even think about scrubbing, let’s get organized. Having everything you need at your fingertips will make the process so much smoother. Here’s my go-to list:
* Cleaning Solutions:
* All-purpose cleaner (I prefer a natural, eco-friendly option)
* White vinegar (a cleaning powerhouse!)
* Baking soda (another natural cleaning superstar)
* Bleach (use with caution and proper ventilation)
* Dish soap (for greasy spots)
* Glass cleaner
* Tools:
* Microfiber cloths (lots of them!)
* Sponges (both abrasive and non-abrasive)
* Scrub brush (a stiff-bristled one is ideal)
* Old toothbrush (for those hard-to-reach spots)
* Spray bottles (for your cleaning solutions)
* Vacuum cleaner with attachments
* Mop and bucket
* Rubber gloves (protect those hands!)
* Screwdriver (for removing lint trap covers)
* Small bucket or container
* Lint roller
* Optional but Helpful:
* Magic Eraser (for stubborn marks)
* Essential oils (for a fresh scent)
* Dryer sheets (for dusting)
* Trash bags
Phase 1: Emptying and Prepping the Space
This is where we clear the decks and get ready for the real work.
1. Remove Everything: Take out all laundry baskets, detergent bottles, dryer sheets, and anything else that’s cluttering the space. This gives you a clear view of what you’re working with and prevents you from just cleaning around the mess.
2. Sort and Declutter: While everything is out, take a moment to sort through it. Toss empty bottles, expired products, and anything you no longer use. This is a great opportunity to streamline your laundry supplies.
3. Sweep or Vacuum: Give the floor a good sweep or vacuum to remove loose dirt, dust bunnies, and stray socks. Pay special attention to corners and under appliances.
4. Protect the Floor: If you’re using harsh chemicals, consider laying down a drop cloth or old towels to protect your flooring.
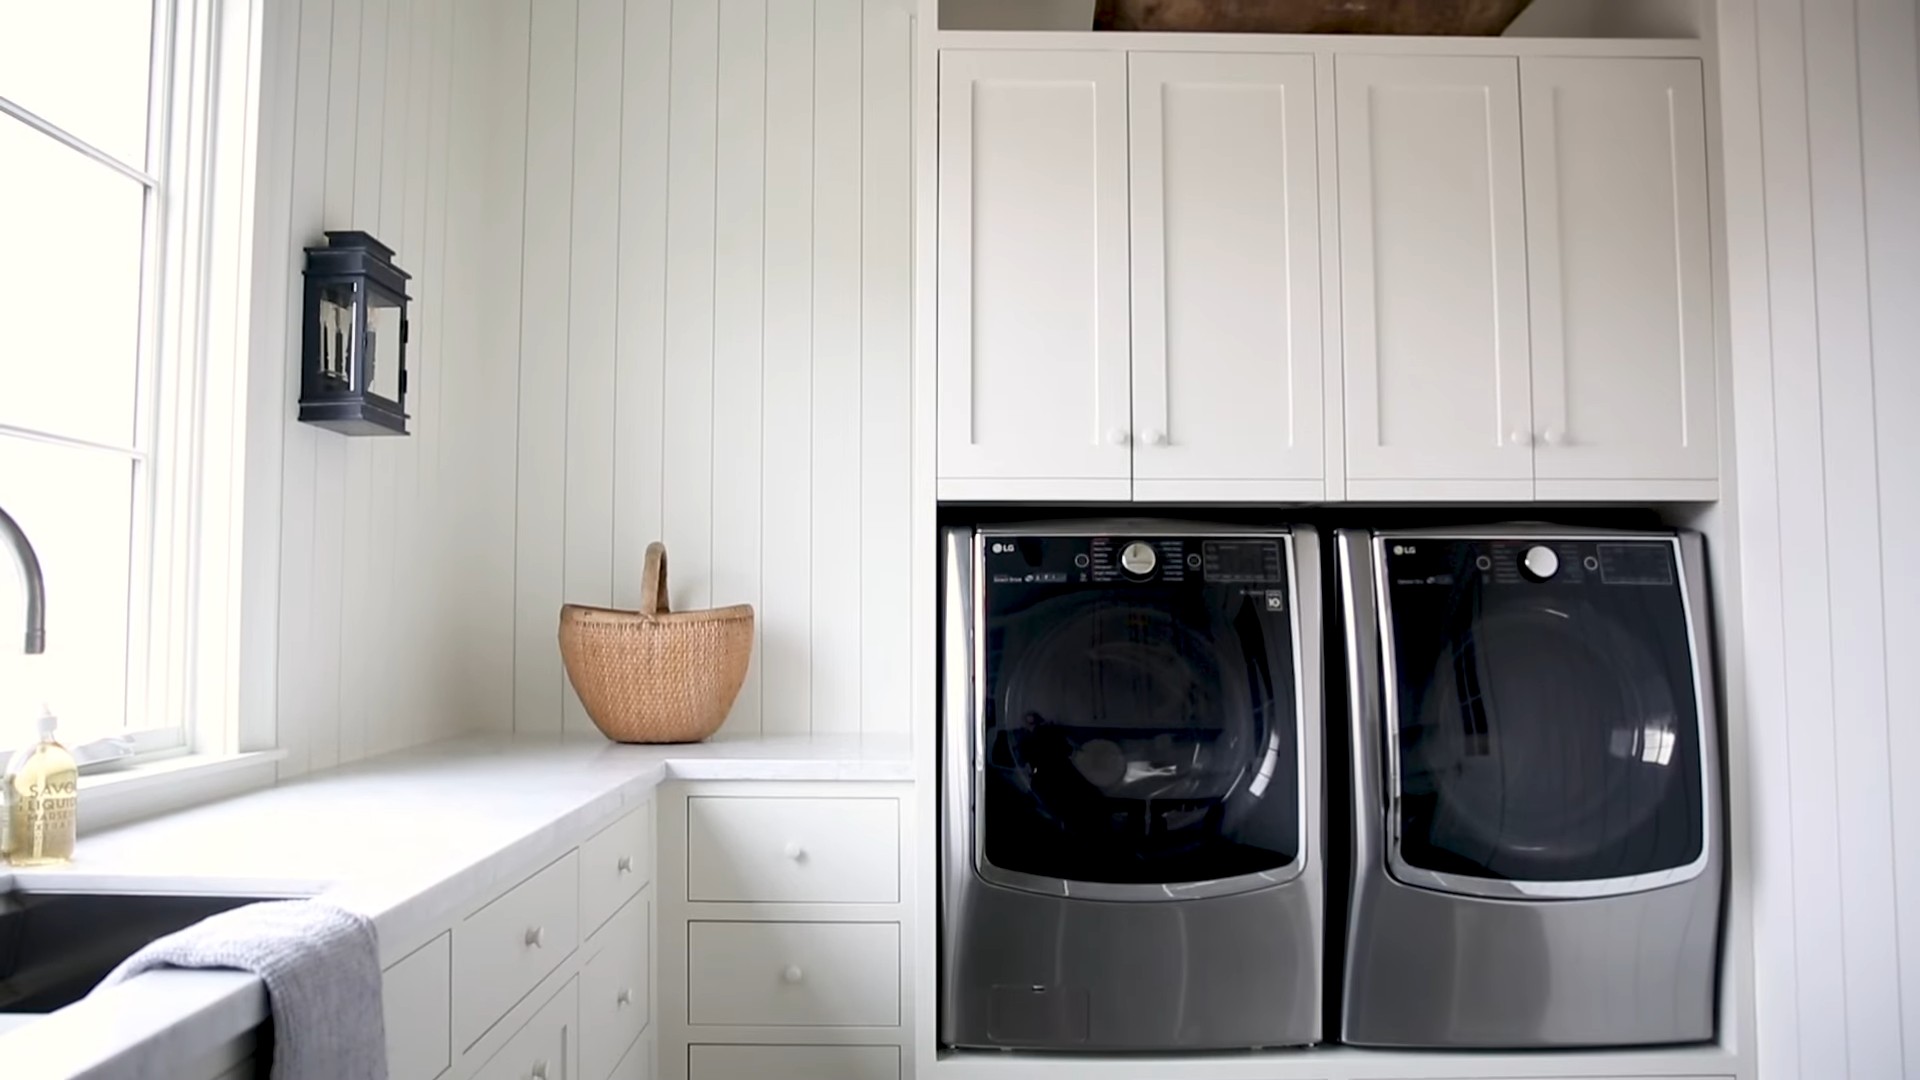
Phase 2: Cleaning the Washing Machine
Your washing machine works hard, so it deserves some love! A clean washing machine means cleaner clothes.
1. Clean the Dispenser Drawers: Remove the detergent and fabric softener dispensers. Soak them in warm, soapy water for about 30 minutes to loosen any buildup. Scrub them clean with a brush or sponge, rinse thoroughly, and let them dry completely before replacing them. If your dispenser drawers are really grimy, you can try soaking them in a solution of white vinegar and water.
2. Clean the Rubber Gasket (Front Loaders): This is where mold and mildew love to hide! Carefully inspect the rubber gasket around the door. Use a damp cloth or sponge to wipe away any visible grime. For stubborn mold, mix a solution of bleach and water (1 part bleach to 10 parts water) and carefully scrub the affected areas. Important: Wear gloves and eye protection when working with bleach, and ensure proper ventilation. Rinse thoroughly with clean water after cleaning.
3. Run a Cleaning Cycle: Most modern washing machines have a self-cleaning cycle. Follow the manufacturer’s instructions to run this cycle. If your machine doesn’t have a self-cleaning cycle, you can use a mixture of white vinegar and baking soda.
* For Top Loaders: Fill the washing machine with hot water. Add 2 cups of white vinegar and 1/2 cup of baking soda. Let it agitate for a few minutes, then stop the cycle and let it soak for at least 30 minutes (or even overnight for a really deep clean). Drain the water and run a regular wash cycle with hot water to rinse.
* For Front Loaders: Add 1/4 cup of baking soda to the detergent dispenser and 2 cups of white vinegar to the drum. Run a normal wash cycle on the hottest setting.
4. Wipe Down the Exterior: Use an all-purpose cleaner to wipe down the exterior of the washing machine, including the control panel and any knobs or buttons.
Phase 3: Cleaning the Dryer
A clean dryer is a safe dryer! Lint buildup is a fire hazard, so this step is crucial.
1. Clean the Lint Trap: This should be done after every load, but now’s the time for a really thorough cleaning. Remove the lint trap and vacuum out any remaining lint. Wash the lint trap with warm, soapy water and a brush to remove any residue from dryer sheets. Let it dry completely before replacing it.
2. Clean the Dryer Vent: This is where lint can really accumulate. Disconnect the dryer vent from the back of the dryer. Use a vacuum cleaner with a hose attachment to remove any lint from the vent. You can also purchase a dryer vent cleaning kit, which includes a long brush that can reach deep into the vent. Important: If you’re not comfortable disconnecting the dryer vent yourself, consider hiring a professional to do it.
3. Wipe Down the Interior: Use a damp cloth to wipe down the inside of the dryer drum. You can also use a solution of white vinegar and water to remove any residue.
4. Wipe Down the Exterior: Use an all-purpose cleaner to wipe down the exterior of the dryer, including the control panel and any knobs or buttons.
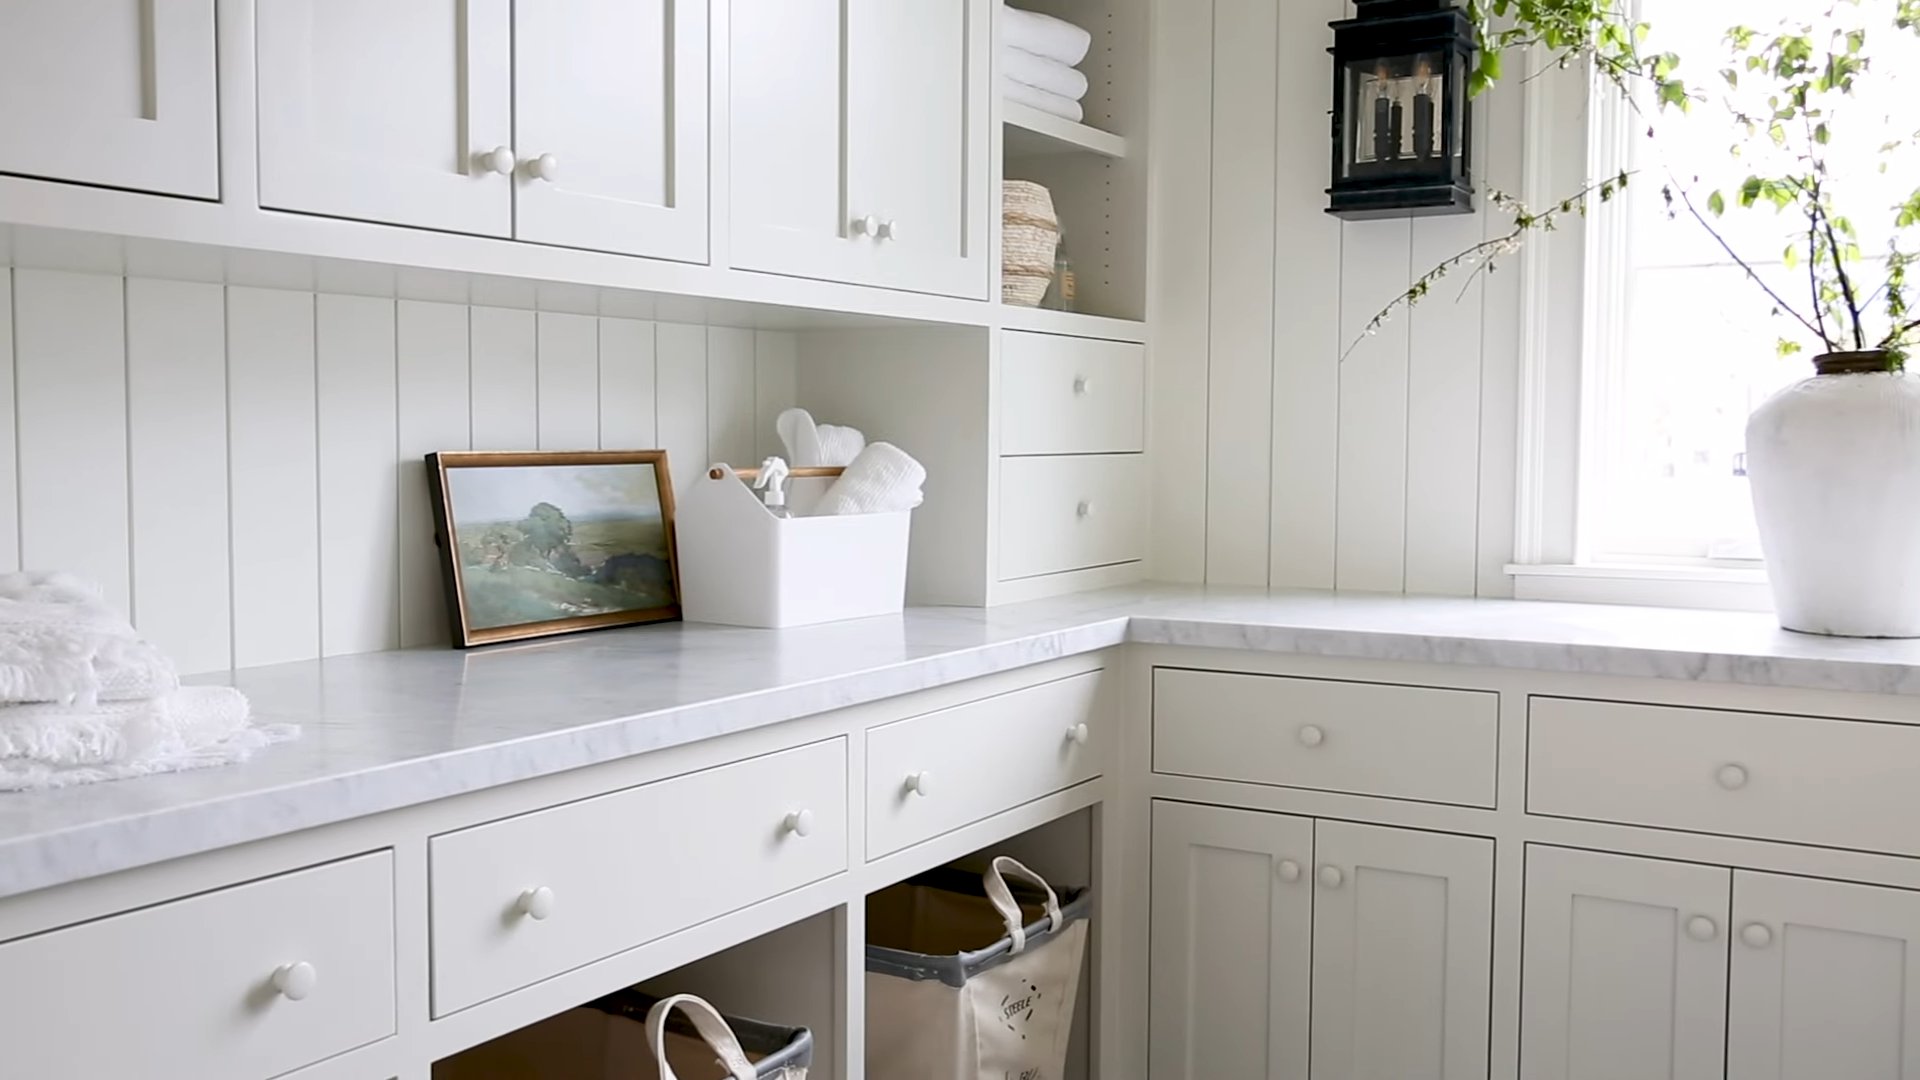
Phase 4: Cleaning Surfaces and Fixtures
Now that the appliances are sparkling, let’s tackle the rest of the room.
1. Clean Countertops and Shelves: Wipe down all countertops and shelves with an all-purpose cleaner. Remove any stains or spills with a sponge or Magic Eraser.
2. Clean the Sink: Scrub the sink with a sponge and dish soap. Rinse thoroughly and dry with a clean cloth. For stubborn stains, you can use a paste of baking soda and water.
3. Clean the Faucet and Hardware: Use a glass cleaner to polish the faucet and other hardware.
4. Clean the Walls and Baseboards: Wipe down the walls with a damp cloth to remove any dust or dirt. Pay special attention to areas near the washing machine and dryer, where lint and detergent can accumulate. Clean the baseboards with a damp cloth and a mild detergent.
5. Clean the Light Fixtures: Dust the light fixtures with a dry cloth or a vacuum cleaner with a brush attachment. If the fixtures are dirty, you can wipe them down with a damp cloth and a mild detergent. Important: Turn off the power to the light fixtures before cleaning them.
6. Clean the Windows and Mirrors: Use a glass cleaner to clean the windows and mirrors.
Phase 5: Cleaning the Floor
The final touch!
1. Vacuum or Sweep: Give the floor a final vacuum or sweep to remove any remaining dirt or debris.
2. Mop: Mop the floor with a mop and bucket filled with warm water and a cleaning solution. I like to use a mixture of water and white vinegar for a natural and effective clean.
3. Dry: Allow the floor to air dry completely.
Phase 6: Organizing and Restocking
Almost there! Now, let’s put everything back in its place, but with a little more organization.
1. Organize Laundry Supplies: Group similar items together and store them in baskets or containers. Label the containers so you know what’s inside.
2. Restock Detergent and Supplies: Refill detergent bottles and restock any other laundry supplies that are running low.
3. Arrange Laundry Baskets: Place laundry baskets in a convenient location. Consider using separate baskets for lights, darks, and delicates.
4. Add a Personal Touch: Add a few decorative items to make the laundry room more inviting. A plant, a framed print, or a colorful rug can make a big difference.
5. Maintain the Cleanliness: To keep your laundry room looking its best, make it a habit to wipe up spills immediately, clean the lint trap after every load, and do a quick sweep of the floor regularly.
And there you have it! A sparkling clean and organized laundry room. Now, go put your feet up and enjoy the fruits of your labor. You deserve it!
Conclusion
Transforming your laundry room from a cluttered chaos zone to a sparkling, efficient space doesn’t require expensive professional services or harsh chemicals. This DIY deep cleaning trick, focusing on natural and readily available ingredients, is a game-changer for anyone looking to revitalize their laundry routine and create a more pleasant home environment. We’ve shown you how to tackle the grime, eliminate odors, and organize your essentials, all with simple steps and minimal effort.
Why is this DIY laundry room deep cleaning a must-try? Because it’s not just about aesthetics; it’s about creating a healthier, more functional space. A clean laundry room reduces allergens, prevents mold growth, and extends the lifespan of your appliances. Plus, the satisfaction of knowing you achieved this with your own two hands, using eco-friendly methods, is incredibly rewarding.
Don’t be afraid to experiment with variations to personalize your cleaning routine. For instance, if you prefer a stronger scent, add a few drops of your favorite essential oil (like lavender or eucalyptus) to your cleaning solutions. If you have particularly stubborn stains on your washing machine, create a paste of baking soda and water and let it sit for a few hours before scrubbing. For those with sensitive skin, consider wearing gloves during the cleaning process and opting for fragrance-free cleaning agents. You can also use vinegar and baking soda to clean your washing machine.
Ready to reclaim your laundry room? We wholeheartedly encourage you to try this DIY deep cleaning trick. It’s a simple, effective, and affordable way to create a space you’ll actually enjoy spending time in. And once you’ve experienced the difference a clean and organized laundry room can make, you’ll wonder why you didn’t do it sooner.
But the journey doesn’t end here! We want to hear about your experiences. Share your before-and-after photos, your favorite cleaning tips, and any variations you tried in the comments below. Let’s create a community of clean laundry enthusiasts and inspire each other to maintain a sparkling home. Your insights could be invaluable to someone else embarking on their own laundry room transformation. So, grab your supplies, roll up your sleeves, and get ready to experience the joy of a truly clean and organized laundry room! Let us know how this **laundry room deep cleaning** method worked for you!
Frequently Asked Questions (FAQ)
1. How often should I deep clean my laundry room?
The frequency of deep cleaning your laundry room depends on how often you use it and the level of traffic it experiences. As a general guideline, aim for a deep clean every 3-6 months. However, if you have pets, young children, or a particularly busy household, you might consider deep cleaning more frequently, perhaps every 2-3 months. Regular spot cleaning and maintenance, such as wiping down surfaces and sweeping the floor, should be done weekly to prevent buildup and maintain cleanliness between deep cleans.
2. What are the best natural cleaning agents to use in the laundry room?
Several natural cleaning agents are highly effective for laundry room deep cleaning. White vinegar is a fantastic all-purpose cleaner, disinfectant, and deodorizer. Baking soda is excellent for scrubbing, absorbing odors, and unclogging drains. Lemon juice can be used to remove stains and brighten surfaces. Essential oils, such as tea tree, lavender, and eucalyptus, offer antibacterial and antifungal properties while adding a pleasant scent. Combining these ingredients can create powerful and eco-friendly cleaning solutions. For example, a mixture of vinegar and water is great for wiping down surfaces, while a paste of baking soda and water can tackle stubborn stains.
3. How do I get rid of musty smells in my laundry room?
Musty smells in the laundry room are often caused by trapped moisture and mold growth. To eliminate these odors, start by identifying and addressing the source of the moisture. Ensure proper ventilation by opening windows or using a dehumidifier. Clean your washing machine thoroughly, paying attention to the rubber seals and detergent dispenser. Run an empty cycle with hot water and a cup of white vinegar or baking soda. Wipe down all surfaces with a vinegar solution. Place open boxes of baking soda or bowls of activated charcoal in the laundry room to absorb odors. You can also use essential oil diffusers or homemade air fresheners to create a more pleasant scent.
4. How can I organize my laundry room to maximize space?
Effective organization is key to a functional laundry room. Start by decluttering and getting rid of items you no longer need. Utilize vertical space by installing shelves or cabinets above the washer and dryer. Use baskets and bins to store laundry supplies, such as detergent, fabric softener, and dryer sheets. Consider a rolling cart for easy access to frequently used items. Install a hanging rod for air-drying clothes. Fold or roll towels and linens to save space. Label containers clearly to easily identify their contents. A well-organized laundry room not only looks better but also makes laundry day more efficient.
5. How do I clean my washing machine effectively?
Cleaning your washing machine regularly is essential to prevent mold growth, remove detergent buildup, and maintain its performance. For top-loading machines, fill the tub with hot water and add 1 cup of white vinegar or baking soda. Let it agitate for a few minutes, then stop the machine and let it sit for an hour before completing the cycle. For front-loading machines, clean the rubber seal around the door with a vinegar solution to remove mold and mildew. Run an empty cycle with hot water and a washing machine cleaner or vinegar. Clean the detergent dispenser regularly to prevent clogs. Leave the door slightly ajar after each use to allow the machine to air dry.
6. What should I do if I find mold in my laundry room?
If you discover mold in your laundry room, it’s crucial to address it promptly to prevent health problems and further damage. Wear protective gear, such as gloves, a mask, and eye protection. Clean the affected area with a mixture of bleach and water (1 part bleach to 10 parts water) or a commercial mold remover. Scrub the area thoroughly and rinse with clean water. Ensure proper ventilation to allow the area to dry completely. If the mold infestation is extensive or you are sensitive to mold, consider hiring a professional mold remediation service.
7. How can I prevent lint buildup in my dryer?
Lint buildup in your dryer can pose a fire hazard and reduce its efficiency. Clean the lint trap after each load to remove accumulated lint. Periodically clean the dryer vent duct to remove any lint that has bypassed the lint trap. You can use a dryer vent cleaning kit or hire a professional to do this. Avoid overloading the dryer, as this can contribute to lint buildup. Ensure that the dryer vent is properly installed and vented to the outside. Regularly inspect the dryer vent for any blockages or damage.
8. Are there any specific safety precautions I should take when deep cleaning my laundry room?
Yes, safety should always be a priority when deep cleaning your laundry room. Wear gloves to protect your skin from harsh chemicals and irritants. Ensure proper ventilation to avoid inhaling fumes. Avoid mixing bleach with ammonia or other cleaning agents, as this can create toxic gases. Unplug appliances before cleaning them to prevent electric shock. Keep cleaning products out of reach of children and pets. Read and follow the instructions on cleaning product labels carefully. If you are using a ladder to reach high areas, ensure it is stable and secure.
9. Can I use essential oils to freshen up my laundry room?
Absolutely! Essential oils are a natural and effective way to freshen up your laundry room. Add a few drops of your favorite essential oil to a diffuser or create a homemade air freshener by mixing essential oils with water in a spray bottle. You can also add a few drops of essential oil to dryer balls to infuse your laundry with a pleasant scent. Popular essential oils for laundry rooms include lavender, lemon, eucalyptus, tea tree, and peppermint. Be sure to use high-quality essential oils and follow dilution guidelines to avoid skin irritation or damage to surfaces.
10. What are some eco-friendly alternatives to traditional laundry detergents and fabric softeners?
There are many eco-friendly alternatives to traditional laundry detergents and fabric softeners that are gentler on the environment and your skin. Consider using plant-based laundry detergents that are free of harsh chemicals, dyes, and fragrances. Soap nuts are a natural and reusable alternative to laundry detergent. White vinegar can be used as a natural fabric softener and odor eliminator. Dryer balls made of wool or plastic can help soften clothes and reduce drying time. You can also make your own laundry detergent and fabric softener using simple ingredients like baking soda, washing soda, and essential oils.


Leave a Comment