

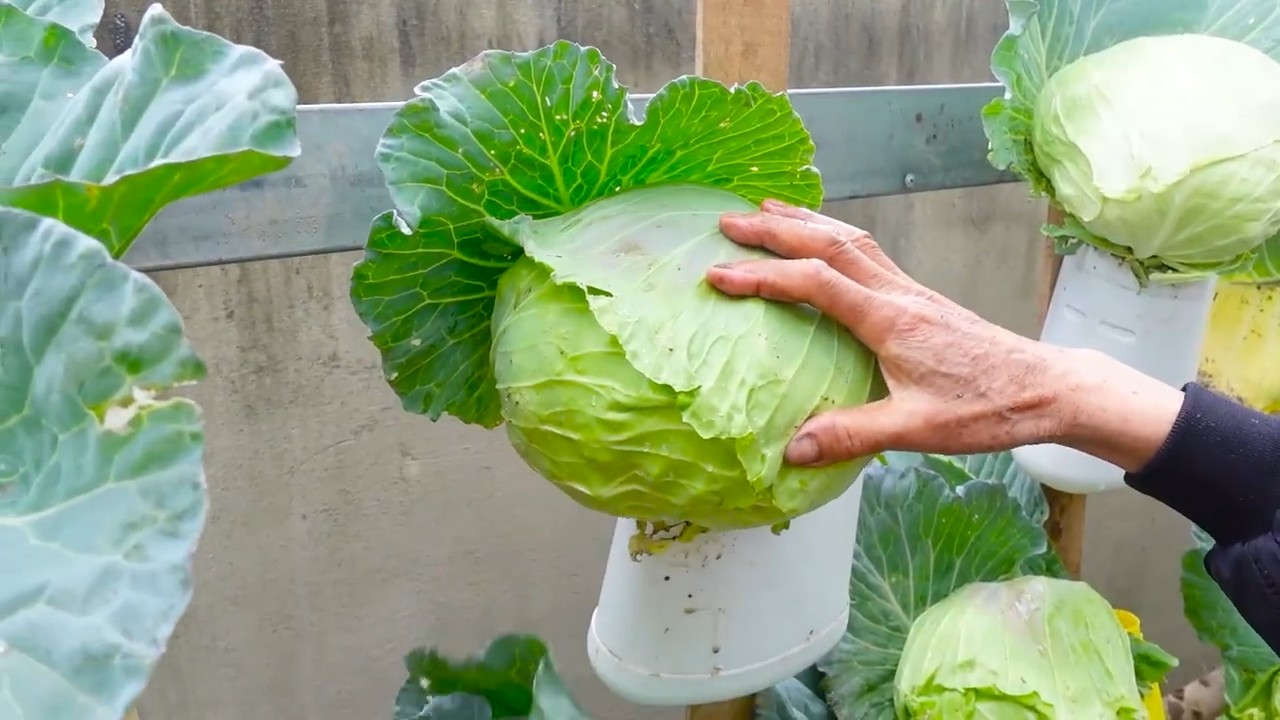
Plastic Bottle Cabbage Garden: Ever dreamed of harvesting your own crisp, delicious cabbages right outside your doorstep, even if you’re short on space or time? I know I have! Forget sprawling fields and back-breaking labor; we’re diving into the ingenious world of upcycling and creating a thriving cabbage patch using something you probably already have lying around: plastic bottles!
For centuries, cultivating cabbage has been a cornerstone of diets across the globe, from the hearty stews of Eastern Europe to the vibrant slaws of Asia. But what if I told you that you could participate in this rich culinary tradition in a way that’s both sustainable and incredibly easy? This DIY project isn’t just about growing vegetables; it’s about connecting with nature, reducing waste, and enjoying the satisfaction of nurturing your own food source.
In today’s fast-paced world, finding time for traditional gardening can feel impossible. That’s where this plastic bottle cabbage garden hack comes in. It’s perfect for apartment dwellers, busy professionals, or anyone looking for a low-maintenance, eco-friendly way to grow their own food. Imagine the joy of snipping fresh cabbage leaves for your salads or stir-fries, knowing you grew them yourself, using recycled materials! This guide will walk you through every step, ensuring you have a flourishing cabbage garden in no time. Let’s get started!
DIY Vertical Cabbage Garden from Plastic Bottles
Hey there, fellow gardening enthusiasts! Are you short on space but dreaming of fresh, homegrown cabbage? Well, you’ve come to the right place! I’m going to walk you through how to create a fantastic vertical cabbage garden using recycled plastic bottles. It’s a fun, eco-friendly project that’s perfect for balconies, patios, or even small backyards. Get ready to turn those discarded bottles into a thriving cabbage patch!
Materials You’ll Need
Before we dive in, let’s gather our supplies. This is what you’ll need to create your vertical cabbage garden:
- Plastic Bottles: Lots of them! The number depends on how big you want your garden to be. Aim for bottles that are at least 2 liters in size. Clear or translucent bottles work best to allow sunlight to reach the plants.
- Cabbage Seedlings: Choose your favorite cabbage varieties! Consider different colors and sizes for a visually appealing garden.
- Potting Soil: A good quality potting mix is essential for healthy cabbage growth.
- Scissors or Utility Knife: For cutting the plastic bottles. Be careful!
- Drill or Awl: To create drainage holes and hanging points.
- Rope or Strong Twine: For hanging the bottles. Make sure it’s weather-resistant.
- Measuring Tape or Ruler: To ensure consistent spacing.
- Marker: For marking cutting lines on the bottles.
- Gloves: To protect your hands.
- Watering Can or Hose: For watering your cabbage plants.
- Optional: Landscape Fabric or Weed Barrier: To line the bottles and prevent soil erosion.
Preparing the Plastic Bottles
This is a crucial step, so let’s take our time and do it right. We need to transform these bottles into suitable homes for our cabbage seedlings.
- Clean the Bottles: Thoroughly wash the plastic bottles with soap and water to remove any residue or labels. Rinse them well and let them dry completely. This is important to prevent any contamination of your soil.
- Cut the Bottles: Using your marker and ruler, draw a horizontal line around each bottle, about 3-4 inches from the top. This will create the opening for planting. Carefully cut along the line with your scissors or utility knife. I find that scoring the plastic first with the utility knife makes it easier to cut cleanly with scissors.
- Create Drainage Holes: Use your drill or awl to create several drainage holes in the bottom of each bottle. This is essential to prevent waterlogging, which can lead to root rot. Aim for at least 4-5 holes per bottle.
- Optional: Line the Bottles: If you want to prevent soil erosion, you can line the inside of each bottle with landscape fabric or weed barrier. Cut the fabric to fit the inside of the bottle and secure it with a bit of glue or tape. This step is optional, but I highly recommend it, especially if you live in an area with heavy rainfall.
Assembling the Vertical Garden
Now comes the fun part – putting everything together! We’re going to create a cascading tower of cabbage goodness.
- Determine Your Hanging Method: Decide how you want to hang your bottles. You can hang them individually from a fence, railing, or pergola, or you can create a vertical chain. For a chain, you’ll need to create holes for the rope or twine.
- Create Hanging Holes (if needed): If you’re creating a chain, drill or punch two holes on opposite sides of each bottle, near the top. Make sure the holes are large enough to accommodate your rope or twine.
- String the Bottles Together (if creating a chain): Thread the rope or twine through the holes in each bottle, creating a vertical chain. Leave enough space between each bottle for the cabbage plants to grow. I usually aim for about 6-8 inches of space. Secure the rope or twine at the top and bottom of the chain.
- Hang the Bottles: Hang the individual bottles or the vertical chain from your chosen support structure. Make sure the structure is strong enough to support the weight of the bottles, soil, and plants.
Planting the Cabbage Seedlings
Alright, let’s get those cabbage seedlings into their new homes! This is where your garden really starts to come to life.
- Fill the Bottles with Potting Soil: Carefully fill each bottle with potting soil, leaving about an inch of space at the top. Gently pat down the soil to remove any air pockets.
- Plant the Cabbage Seedlings: Dig a small hole in the center of the soil in each bottle. Gently remove a cabbage seedling from its container and place it in the hole. Make sure the top of the root ball is level with the soil surface.
- Backfill with Soil: Fill in the hole around the seedling with potting soil, gently firming it in place.
- Water Thoroughly: Water each bottle thoroughly until water drains out of the drainage holes. This will help settle the soil and ensure the seedlings get a good start.
Caring for Your Vertical Cabbage Garden
Now that your vertical cabbage garden is planted, it’s important to provide proper care to ensure healthy growth and a bountiful harvest.
- Watering: Cabbage plants need consistent moisture, so water your vertical garden regularly, especially during hot, dry weather. Check the soil moisture by sticking your finger into the soil. If it feels dry, it’s time to water. Be careful not to overwater, as this can lead to root rot.
- Sunlight: Cabbage plants need at least 6 hours of sunlight per day. Choose a location for your vertical garden that receives plenty of sunlight. If you live in a particularly hot climate, you may need to provide some afternoon shade to prevent the plants from getting scorched.
- Fertilizing: Cabbage plants are heavy feeders, so fertilize your vertical garden regularly with a balanced fertilizer. Follow the instructions on the fertilizer package. I like to use a liquid fertilizer diluted in water, applying it every 2-3 weeks.
- Pest Control: Keep an eye out for pests, such as cabbage worms, aphids, and slugs. Inspect your plants regularly and take action if you see any signs of infestation. You can use organic pest control methods, such as insecticidal soap or neem oil. Handpicking pests is also an effective method.
- Weeding: Remove any weeds that may grow in the bottles. Weeds can compete with the cabbage plants for nutrients and water.
- Rotating the Bottles: To ensure even sunlight exposure, rotate the bottles periodically. This will help prevent the plants from leaning towards the sun.
Harvesting Your Cabbage
The moment you’ve been waiting for! Harvesting your homegrown cabbage is incredibly rewarding.
- Check for Maturity: Cabbage is typically ready to harvest when the head is firm and compact. The size of the head will vary depending on the variety.
- Harvesting: Use a sharp knife to cut the cabbage head from the stem, leaving a few outer leaves intact.
- Enjoy Your Harvest: Enjoy your fresh, homegrown cabbage in salads, slaws, soups, or stir-fries.
Troubleshooting
Even with the best care, you might encounter some challenges. Here are a few common problems and how to address them:
- Yellowing Leaves: This could be a sign of nutrient deficiency. Try fertilizing with a balanced fertilizer.
- Slow Growth: This could be due to insufficient sunlight or water. Make sure your plants are getting enough of both.
- Pest Infestation: Identify the pest and take appropriate action, such as using insecticidal soap or neem oil.
- Root Rot: This is caused by overwatering. Make sure your bottles have adequate drainage and avoid overwatering.
And there you have it! A complete guide to creating your own vertical cabbage garden from plastic bottles. It’s a fun, sustainable, and rewarding project that will provide you with fresh, homegrown cabbage for months to come. Happy gardening!
Conclusion
So, there you have it! Transforming discarded plastic bottles into a thriving cabbage garden is not just a clever upcycling project; it’s a sustainable solution that brings fresh, homegrown goodness right to your doorstep. This DIY trick offers a multitude of benefits, from space-saving vertical gardening to efficient water management and protection against pests. It’s a win-win for your garden and the environment.
But why is this method a must-try? Beyond the obvious environmental advantages, consider the sheer convenience. Whether you have a sprawling backyard or a tiny balcony, this method adapts to your space. The controlled environment within the plastic bottles allows you to nurture your cabbage seedlings with precision, ensuring optimal growth and minimizing the risk of common garden ailments. Plus, the visual appeal of a wall adorned with lush, green cabbage plants is undeniably charming.
Ready to take your cabbage cultivation to the next level? Here are a few suggestions and variations to inspire you:
* Experiment with different bottle sizes: Smaller bottles are perfect for starting seedlings, while larger bottles can accommodate mature cabbage plants.
* Add companion plants: Interplant your cabbage with herbs like dill or rosemary to deter pests and enhance flavor.
* Create a vertical garden wall: Arrange your plastic bottle planters in a visually appealing pattern on a wall or fence.
* Consider hydroponics: For an even more efficient system, explore hydroponic techniques within your plastic bottle planters. This involves using nutrient-rich water solutions instead of soil.
* Get creative with decoration: Paint the bottles with vibrant colors or add decorative elements to personalize your garden.
This DIY plastic bottle cabbage garden is more than just a gardening technique; it’s a statement about sustainability, resourcefulness, and the joy of growing your own food. It’s a project that’s both rewarding and impactful.
We wholeheartedly encourage you to give this DIY trick a try. It’s easier than you might think, and the results are truly gratifying. Imagine harvesting your own fresh, crisp cabbage, knowing that you’ve contributed to a greener planet in the process.
Don’t hesitate to experiment, adapt, and make this project your own. And most importantly, share your experience with us! We’d love to see your creations, hear your tips, and learn from your successes. Post photos of your plastic bottle cabbage garden on social media using #PlasticBottleCabbageGarden and tag us so we can celebrate your green thumb. Let’s inspire others to embrace sustainable gardening practices and transform waste into wonder. Happy gardening!
Frequently Asked Questions (FAQ)
What type of plastic bottles are best for this project?
Ideally, you should use food-grade plastic bottles, such as those used for water, soda, or juice. These are generally made from PET (polyethylene terephthalate) or HDPE (high-density polyethylene), which are considered safe for growing food. Avoid using bottles that have contained harsh chemicals or cleaning products, as these could contaminate your plants. Thoroughly wash and rinse the bottles before using them. Clear or translucent bottles are preferable as they allow sunlight to reach the soil.
How do I ensure proper drainage in the plastic bottle planters?
Drainage is crucial to prevent waterlogging and root rot. Before planting, drill or poke several drainage holes in the bottom of each bottle. The number and size of the holes will depend on the size of the bottle and the type of soil you’re using. A good rule of thumb is to create at least four to five holes, each about ¼ inch in diameter. You can also add a layer of gravel or small stones at the bottom of the bottle to further improve drainage.
What type of soil should I use for growing cabbage in plastic bottles?
A well-draining, nutrient-rich potting mix is ideal for growing cabbage in plastic bottles. Avoid using garden soil, as it can be too heavy and may not drain properly. A good potting mix will contain a blend of peat moss, perlite, and vermiculite, which provide excellent drainage and aeration. You can also amend the potting mix with compost or other organic matter to boost its nutrient content. Cabbage prefers slightly acidic soil with a pH between 6.0 and 7.0.
How often should I water my plastic bottle cabbage garden?
The frequency of watering will depend on several factors, including the weather, the size of the bottles, and the type of soil you’re using. Generally, you should water your cabbage plants when the top inch of soil feels dry to the touch. Avoid overwatering, as this can lead to root rot. Water thoroughly, ensuring that the water drains out of the drainage holes. During hot, dry weather, you may need to water more frequently. Consider using a watering can with a gentle rose head to avoid disturbing the soil and damaging the plants.
How much sunlight do cabbage plants need in a plastic bottle garden?
Cabbage plants need at least six hours of direct sunlight per day to thrive. Choose a location for your plastic bottle garden that receives ample sunlight. If you’re growing your cabbage indoors, you may need to supplement with artificial lighting, such as grow lights. Rotate the bottles regularly to ensure that all sides of the plants receive adequate sunlight.
How do I fertilize my cabbage plants in plastic bottles?
Cabbage plants are heavy feeders and require regular fertilization. Use a balanced fertilizer, such as a 10-10-10 or 20-20-20, according to the package instructions. You can also use organic fertilizers, such as compost tea or fish emulsion. Fertilize your cabbage plants every two to three weeks during the growing season. Avoid over-fertilizing, as this can burn the roots.
How do I protect my cabbage plants from pests and diseases in a plastic bottle garden?
Plastic bottle gardening can actually help to minimize pest and disease issues, but it’s still important to take precautions. Regularly inspect your plants for signs of pests, such as aphids, cabbage worms, or slugs. Handpick any pests that you find. You can also use organic pest control methods, such as insecticidal soap or neem oil. To prevent diseases, ensure good air circulation around your plants and avoid overwatering. Remove any diseased leaves promptly.
How long does it take to grow cabbage in plastic bottles?
The time it takes to grow cabbage from seed to harvest varies depending on the variety and growing conditions. Generally, it takes about 60 to 80 days to harvest cabbage from transplants. Starting your cabbage plants indoors from seed can give you a head start.
Can I grow other vegetables in plastic bottles using this method?
Absolutely! This method is versatile and can be used to grow a variety of other vegetables, herbs, and flowers. Some popular choices include lettuce, spinach, kale, tomatoes, peppers, strawberries, and basil. The key is to choose plants that are well-suited to container gardening and that have similar growing requirements.
How do I overwinter my plastic bottle cabbage garden?
Depending on your climate, you may be able to overwinter your cabbage plants in plastic bottles. Cabbage is relatively cold-hardy and can tolerate light frosts. In colder climates, you can protect your plants by moving them to a sheltered location, such as a garage or greenhouse. You can also cover them with a frost blanket. Reduce watering during the winter months. In the spring, gradually acclimate your plants to outdoor conditions before moving them back to their permanent location.


Leave a Comment