

Plastic Bottle Strawberry Growing: Imagine plucking juicy, sun-ripened strawberries straight from your balcony, patio, or even a sunny windowsill – all thanks to a clever upcycling project! For centuries, humans have cultivated strawberries, from their humble beginnings as wild berries to the sweet, plump varieties we enjoy today. But what if I told you that you don’t need a sprawling garden to indulge in this delicious pastime?
This DIY guide unlocks the secrets to successful plastic bottle strawberry growing, transforming discarded containers into thriving vertical gardens. In today’s world, where space is often a premium and sustainability is key, this method offers a fantastic solution. Not only does it minimize your environmental footprint by repurposing plastic, but it also allows you to enjoy fresh, organic strawberries regardless of your living situation.
Are you tired of store-bought strawberries that lack flavor and freshness? Do you dream of a vibrant, edible garden but lack the space? Then this project is for you! We’ll walk you through each step, from preparing your bottles to nurturing your plants, ensuring a bountiful harvest of sweet, homegrown goodness. Get ready to unleash your inner gardener and discover the joy of growing your own strawberries with this simple, rewarding DIY project!
DIY Vertical Strawberry Garden from Plastic Bottles
Hey there, fellow gardening enthusiasts! Are you dreaming of fresh, juicy strawberries but short on space? Well, I’ve got the perfect solution for you: a vertical strawberry garden made from recycled plastic bottles! It’s a fun, eco-friendly project that’s surprisingly easy to pull off. Plus, it’s a great way to impress your neighbors with your ingenuity and green thumb. Let’s get started!
What You’ll Need
Before we dive in, let’s gather our supplies. Here’s a list of everything you’ll need to create your own vertical strawberry garden:
* Plastic Bottles: Lots of them! The number depends on how tall you want your garden to be. Aim for at least 6-8 bottles to start. Soda bottles, water bottles – anything works, just make sure they’re clean.
* Potting Soil: You’ll need a good quality potting mix that drains well. Strawberries like slightly acidic soil, so a mix formulated for berries is ideal, but not essential.
* Strawberry Plants: Choose everbearing varieties for a continuous harvest throughout the season. I personally love ‘Albion’ and ‘Seascape’ for their flavor and productivity.
* Utility Knife or Scissors: For cutting the bottles. Be careful!
* Drill or Screwdriver: To create drainage holes and hanging points.
* Rope or Strong Twine: To hang the bottles.
* Measuring Tape or Ruler: For consistent hole placement.
* Permanent Marker: To mark cutting and drilling points.
* Gravel or Small Stones: For drainage at the bottom of each bottle.
* Watering Can or Hose: For watering your strawberry plants.
* Gloves: To protect your hands. (Optional, but recommended!)
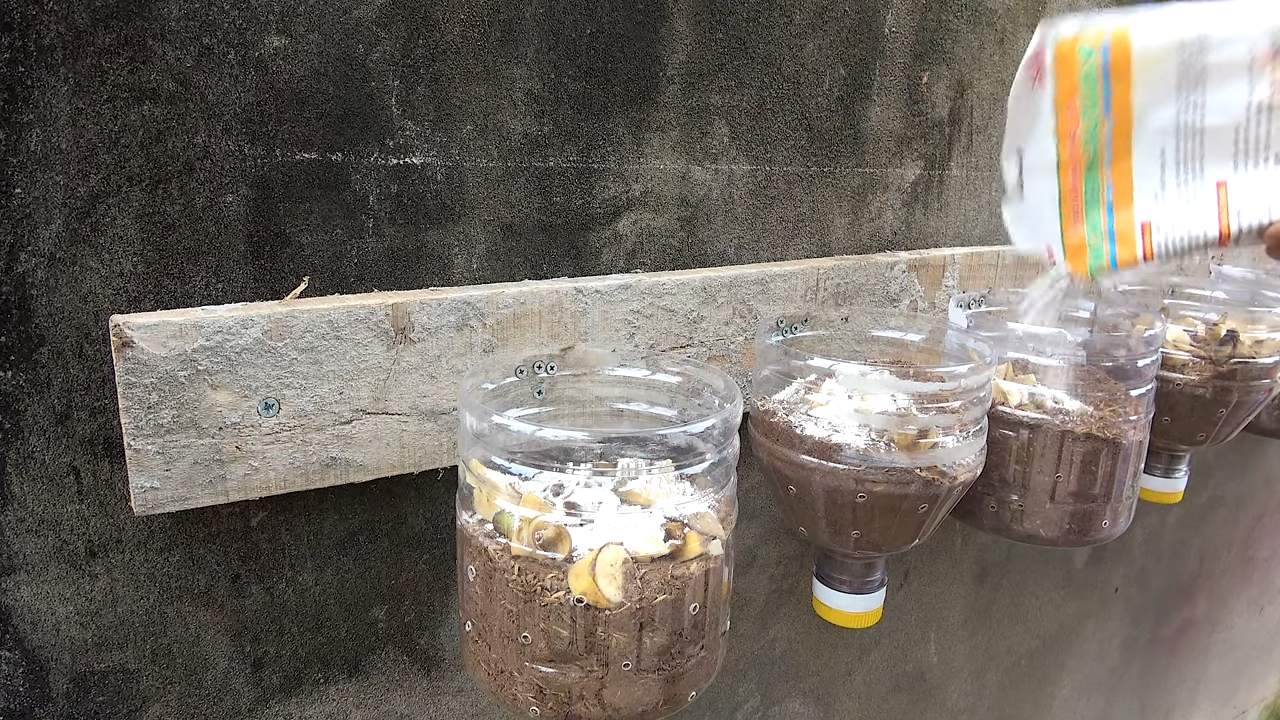
Preparing the Bottles
This is where the magic begins! We’re going to transform those humble plastic bottles into cozy little homes for our strawberry plants.
1. Clean the Bottles: Thoroughly wash each bottle with soap and water to remove any residue. Rinse them well and let them dry completely. This is crucial for preventing mold and ensuring a healthy environment for your plants.
2. Cut the Bottles: This is the trickiest part, so take your time and be careful. Using your utility knife or scissors, cut a large rectangular opening in the side of each bottle. This opening should be large enough to easily plant your strawberry plants. I usually make mine about 4 inches wide and 6 inches long. Make sure to leave enough of the bottle intact to maintain its structural integrity. You don’t want it collapsing under the weight of the soil!
3. Create Drainage Holes: Now, we need to make sure the water can drain properly. Using your drill or screwdriver, create several small drainage holes in the bottom of each bottle. About 4-5 holes should be sufficient. This will prevent the soil from becoming waterlogged, which can lead to root rot.
4. Add Gravel: Before adding soil, place a layer of gravel or small stones at the bottom of each bottle. This will further improve drainage and prevent the drainage holes from becoming clogged with soil. A layer of about an inch is perfect.
Assembling the Vertical Garden
Now for the fun part – putting it all together! This is where your creativity can really shine.
1. Mark Hanging Points: Decide how you want to hang your bottles. You can hang them vertically, one below the other, or horizontally, side by side. For a vertical arrangement, mark two points on either side of the bottle’s neck, near the top. These will be your hanging points.
2. Drill Hanging Holes: Using your drill or screwdriver, carefully drill holes at the marked points. Make sure the holes are large enough to accommodate your rope or twine.
3. String the Bottles: Cut lengths of rope or twine long enough to hang your bottles at the desired height. Thread the rope through the hanging holes of each bottle, securing them in place. You can use knots or simply tie the rope tightly around the bottle necks. Make sure the bottles are spaced evenly apart to allow for adequate sunlight and air circulation. I like to leave about 6-8 inches between each bottle.
4. Secure the Top: At the top of your vertical garden, create a loop or knot in the rope so you can easily hang it from a hook, railing, or other sturdy support. Make sure the support is strong enough to hold the weight of the bottles, soil, and plants.
Planting Your Strawberries
Almost there! Now it’s time to give your strawberry plants a new home.
1. Fill with Soil: Carefully fill each bottle with potting soil, leaving about an inch of space at the top. Gently pat down the soil to remove any air pockets.
2. Plant the Strawberries: Gently remove your strawberry plants from their containers and loosen the roots slightly. Dig a small hole in the soil in each bottle and carefully place the plant in the hole. Make sure the crown of the plant (where the stems meet the roots) is level with the soil surface.
3. Water Thoroughly: After planting, water your strawberry plants thoroughly until the water drains out of the drainage holes. This will help settle the soil and encourage root growth.
Caring for Your Vertical Strawberry Garden
Congratulations! You’ve created your own vertical strawberry garden. Now, let’s talk about how to keep it thriving.
* Sunlight: Strawberries need at least 6-8 hours of sunlight per day. Place your vertical garden in a sunny location where it will receive plenty of light. If you don’t have a sunny spot, you can supplement with grow lights.
* Watering: Water your strawberry plants regularly, especially during hot, dry weather. Check the soil moisture by sticking your finger into the soil. If the top inch feels dry, it’s time to water. Avoid overwatering, as this can lead to root rot.
* Fertilizing: Feed your strawberry plants every 2-3 weeks with a balanced liquid fertilizer. Follow the instructions on the fertilizer label. I like to use a fertilizer specifically formulated for berries.
* Pruning: Remove any dead or yellowing leaves to keep your plants healthy and productive. You can also prune the runners (the long, trailing stems) to encourage the plants to focus their energy on producing fruit.
* Pest Control: Keep an eye out for pests such as aphids, spider mites, and slugs. If you notice any pests, treat them with an appropriate insecticide or organic pest control method. I prefer using insecticidal soap or neem oil.
* Winter Protection: In colder climates, you’ll need to protect your strawberry plants from frost and freezing temperatures. You can move your vertical garden indoors or cover it with a blanket or tarp.
Troubleshooting Tips
Even with the best care, you might encounter a few challenges along the way. Here are some common problems and how to fix them:
* Yellowing Leaves: This could be a sign of overwatering, underwatering, or nutrient deficiency. Adjust your watering schedule and fertilize your plants regularly.
* Lack of Fruit: This could be due to insufficient sunlight, poor pollination, or nutrient deficiency. Make sure your plants are getting enough sunlight and fertilize them regularly. You can also hand-pollinate the flowers by gently brushing them with a small paintbrush.
* Root Rot: This is caused by overwatering and poor drainage. Make sure your bottles have adequate drainage holes and avoid overwatering. If you suspect root rot, you can try repotting your plants in fresh soil.
* Pest Infestation: Treat any pest infestations promptly with an appropriate insecticide or organic pest control method.
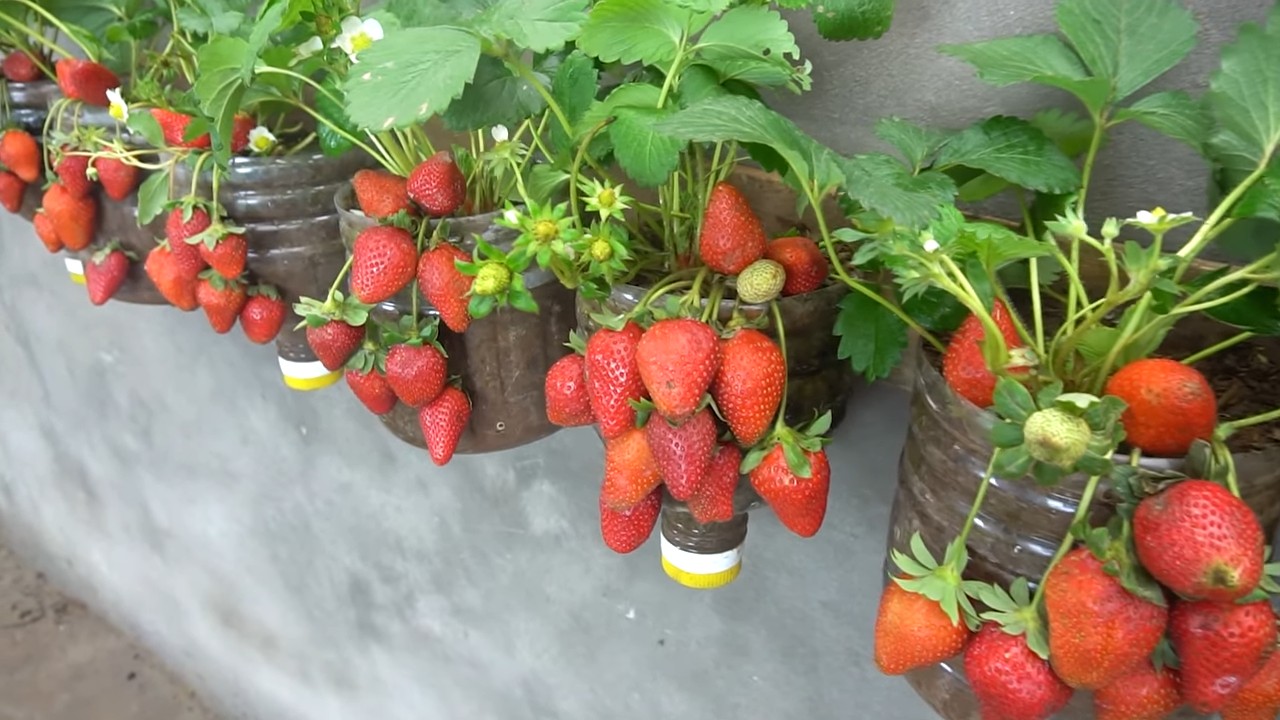
Enjoying Your Harvest
The best part of growing your own strawberries is, of course, enjoying the delicious fruits of your labor! Once your strawberries are ripe (they should be bright red and easily pull away from the plant), gently pick them and enjoy them fresh, in smoothies, or in your favorite desserts.
And there you have it! A beautiful and productive vertical strawberry garden made from recycled plastic bottles. I hope you found this guide helpful and inspiring. Happy gardening!
Conclusion
So, there you have it! Transforming discarded plastic bottles into thriving strawberry planters is not just a clever upcycling project; it’s a gateway to fresh, homegrown strawberries right at your fingertips. This DIY approach to strawberry growing offers a multitude of benefits, from space-saving vertical gardening to cost-effective resourcefulness. It’s a win-win for your garden and the environment.
But why is this particular method a must-try? Firstly, it’s incredibly accessible. Most of us have plastic bottles readily available, making this a virtually free gardening solution. Secondly, the vertical nature of the planters maximizes space, making it ideal for balconies, patios, or even small indoor spaces with sufficient sunlight. Imagine the joy of plucking ripe, juicy strawberries from your own vertical garden, even if you live in an apartment! Thirdly, the controlled environment of the plastic bottle planters allows for better management of soil moisture and drainage, leading to healthier and more productive strawberry plants. You can easily monitor and adjust watering as needed, preventing overwatering or underwatering, which are common pitfalls in traditional gardening.
Beyond the basic method, there’s ample room for customization and experimentation. Consider using different sizes of plastic bottles to accommodate varying root systems. You could even paint the bottles in vibrant colors to add a touch of personality to your garden. For those living in colder climates, consider lining the inside of the bottles with bubble wrap for added insulation during the winter months. Another variation is to incorporate a self-watering system by adding a wick that draws water from a reservoir at the bottom of the bottle. This is especially helpful for busy gardeners who may not have time to water their plants daily. You can also experiment with different types of soil mixes to find the one that works best for your specific climate and strawberry variety. Some gardeners prefer a mix of compost, perlite, and peat moss, while others opt for a more organic blend.
The possibilities are truly endless! This DIY strawberry growing project is not just about growing strawberries; it’s about fostering creativity, resourcefulness, and a deeper connection with nature. It’s about transforming waste into something beautiful and productive.
We wholeheartedly encourage you to give this DIY trick a try. It’s a fun, rewarding, and sustainable way to enjoy fresh strawberries. And most importantly, don’t be afraid to experiment and adapt the method to suit your own needs and preferences.
Once you’ve created your own plastic bottle strawberry garden, we’d love to hear about your experience! Share your photos, tips, and challenges in the comments below. Let’s build a community of DIY strawberry growers and inspire others to embrace sustainable gardening practices. Your insights could be invaluable to someone just starting out. Let’s all learn and grow together! This is a fantastic way to engage in **plastic bottle strawberry growing** and contribute to a greener future.
Frequently Asked Questions (FAQ)
What type of plastic bottles are best for this project?
Ideally, you should use food-grade plastic bottles, such as those used for water, juice, or soda. These are generally made from PET (polyethylene terephthalate) or HDPE (high-density polyethylene), which are considered safe for growing food. Avoid using bottles that have contained harsh chemicals or cleaning products, as these could contaminate the soil and affect the strawberries. Thoroughly wash and rinse the bottles before using them to remove any residue. The size of the bottle will depend on the variety of strawberry you are planting. Smaller bottles are suitable for alpine strawberries, while larger bottles are better for everbearing or June-bearing varieties.
How do I ensure proper drainage in the plastic bottle planters?
Proper drainage is crucial to prevent root rot and ensure healthy strawberry growth. Before adding soil, create drainage holes at the bottom of each bottle section. You can use a drill, a nail, or even a hot glue gun to create these holes. A good rule of thumb is to have at least three to four holes per section. You can also add a layer of gravel or small stones at the bottom of each section to further improve drainage. When watering, make sure the water drains freely from the bottom of the bottles. If the water pools up, it indicates that the drainage holes are clogged and need to be cleared.
What type of soil should I use for growing strawberries in plastic bottles?
Strawberries thrive in well-draining, slightly acidic soil. A good soil mix for plastic bottle planters would be a combination of compost, perlite, and peat moss. Compost provides essential nutrients, perlite improves drainage and aeration, and peat moss helps retain moisture. You can also add a slow-release fertilizer to the soil mix to provide a steady supply of nutrients to the plants. Avoid using garden soil, as it can be too heavy and compact, leading to poor drainage and root problems. You can purchase pre-mixed potting soil specifically formulated for strawberries at most garden centers.
How much sunlight do strawberries need when grown in plastic bottles?
Strawberries need at least six to eight hours of direct sunlight per day to produce abundant fruit. Place your plastic bottle planters in a sunny location, such as a south-facing balcony or patio. If you are growing strawberries indoors, you may need to supplement with artificial lighting, such as grow lights. Rotate the planters regularly to ensure that all sides of the plants receive adequate sunlight. Insufficient sunlight can lead to leggy growth, reduced fruit production, and poor fruit quality.
How often should I water my strawberry plants in plastic bottles?
The frequency of watering will depend on several factors, including the weather, the type of soil, and the size of the bottles. Generally, you should water your strawberry plants when the top inch of soil feels dry to the touch. Avoid overwatering, as this can lead to root rot. During hot, dry weather, you may need to water daily. In cooler, wetter weather, you may only need to water every few days. Check the soil moisture regularly and adjust your watering schedule accordingly. Consider using a moisture meter to accurately assess the soil moisture level.
How do I fertilize my strawberry plants in plastic bottles?
Strawberries are heavy feeders and require regular fertilization to produce abundant fruit. You can use a balanced fertilizer, such as 10-10-10, or a fertilizer specifically formulated for strawberries. Apply the fertilizer according to the instructions on the label. You can also use organic fertilizers, such as compost tea or fish emulsion. Fertilize your strawberry plants every two to four weeks during the growing season. Avoid over-fertilizing, as this can burn the roots and damage the plants.
How do I protect my strawberry plants from pests and diseases?
Plastic bottle planters can help protect your strawberry plants from some pests and diseases, but it’s still important to monitor your plants regularly. Common strawberry pests include aphids, spider mites, and slugs. You can control these pests with insecticidal soap, neem oil, or diatomaceous earth. Common strawberry diseases include powdery mildew and gray mold. You can prevent these diseases by providing good air circulation, avoiding overwatering, and applying a fungicide if necessary. Remove any diseased or dead leaves promptly to prevent the spread of disease.
Can I grow strawberries in plastic bottles indoors?
Yes, you can grow strawberries in plastic bottles indoors, but you will need to provide adequate light and ventilation. Place the planters near a sunny window or use grow lights to provide at least six to eight hours of light per day. Ensure good air circulation by opening a window or using a fan. Indoor strawberry plants may also require hand-pollination to produce fruit. You can use a small paintbrush to transfer pollen from one flower to another.
How long does it take for strawberries to grow in plastic bottles?
The time it takes for strawberries to grow in plastic bottles will depend on the variety of strawberry, the growing conditions, and the age of the plants. Generally, you can expect to harvest your first strawberries within a few months of planting. Everbearing strawberries will produce fruit throughout the growing season, while June-bearing strawberries will produce a large crop of fruit in the spring. Be patient and provide your plants with the care they need, and you will be rewarded with delicious, homegrown strawberries.
What do I do with my strawberry plants in plastic bottles during the winter?
In colder climates, you will need to protect your strawberry plants from freezing temperatures during the winter. You can move the planters indoors to a cool, bright location, such as a garage or basement. Water the plants sparingly during the winter months. Alternatively, you can leave the planters outdoors and protect them with a layer of mulch or straw. You can also wrap the bottles with bubble wrap or burlap to provide extra insulation. In the spring, gradually acclimate the plants to warmer temperatures and increased sunlight.


Leave a Comment