

Quick bathroom cleaning hacks – who doesn’t need them? Let’s be honest, cleaning the bathroom is nobody’s favorite chore. It’s right up there with doing taxes and visiting the dentist! But what if I told you that you could reclaim your weekends and spend less time scrubbing, and more time relaxing?
For centuries, keeping our living spaces clean has been a sign of health and well-being. While the Romans had elaborate bathhouses and dedicated slaves to keep them sparkling, we modern folks are often short on time and resources. That’s where these clever DIY tricks come in!
Life gets busy, and sometimes the bathroom gets neglected. Grime builds up, soap scum clings stubbornly to surfaces, and before you know it, you’re facing a major cleaning project. But fear not! This article is packed with quick bathroom cleaning hacks that will help you tackle the mess efficiently and effectively. I’m going to share my favorite tips and tricks for sparkling surfaces, fresh-smelling air, and a bathroom you’ll actually enjoy spending time in. Get ready to transform your bathroom cleaning routine from a dreaded task to a breeze!
Bathroom Blitz: DIY Cleaning Hacks for a Sparkling Space
Okay, let’s face it, cleaning the bathroom is nobody’s favorite chore. But a sparkling clean bathroom is a happy bathroom! I’m going to share some of my favorite DIY cleaning hacks that will make this task quicker, easier, and maybe even a little bit…dare I say…enjoyable? Let’s get started!
Hack 1: The Shower Head Deep Clean
That shower head can get pretty gross with mineral buildup, affecting water pressure and just looking plain unsightly. Here’s how to give it a deep clean without even removing it!
What You’ll Need:
* A sturdy plastic bag (a Ziploc bag works great)
* White vinegar
* Rubber band or twist tie
* An old toothbrush
* Water
Step-by-Step Instructions:
1. Fill the Bag: Pour enough white vinegar into the plastic bag to completely submerge the shower head.
2. Secure the Bag: Carefully position the bag over the shower head, ensuring the shower head is fully immersed in the vinegar. Use a rubber band or twist tie to tightly secure the bag around the shower head’s neck. Make sure it’s snug to prevent leaks!
3. Soak Overnight: Let the shower head soak in the vinegar overnight (or for at least a few hours). This allows the vinegar to dissolve the mineral deposits.
4. Remove and Scrub: Remove the bag and discard the vinegar. Use an old toothbrush to scrub away any remaining mineral deposits. Pay close attention to the nozzles.
5. Rinse Thoroughly: Turn on the shower and let the water run for a few minutes to thoroughly rinse away any lingering vinegar and loosened debris.
6. Admire Your Work: Enjoy your shower with improved water pressure and a sparkling clean shower head!
Hack 2: Grout Whitening Magic
Grimey grout can make even the cleanest tiles look dirty. This simple paste will brighten your grout lines in no time.
What You’ll Need:
* Baking soda
* Hydrogen peroxide
* An old toothbrush or grout brush
* Water (optional, if needed to adjust consistency)
Step-by-Step Instructions:
1. Make the Paste: In a small bowl, mix baking soda and hydrogen peroxide to form a thick paste. The ratio is usually about 2 parts baking soda to 1 part hydrogen peroxide, but adjust as needed to get a good consistency. If the paste is too thick, add a tiny bit of water.
2. Apply the Paste: Using an old toothbrush or grout brush, apply the paste liberally to the grout lines. Make sure to really get it in there!
3. Let it Sit: Allow the paste to sit on the grout for at least 5-10 minutes. For heavily stained grout, you can let it sit for up to 30 minutes.
4. Scrub: Scrub the grout lines with the toothbrush or grout brush. You should see the grime starting to lift away.
5. Rinse: Rinse the area thoroughly with water. You can use a damp sponge or cloth to wipe away any remaining residue.
6. Repeat if Necessary: For stubborn stains, you may need to repeat the process.
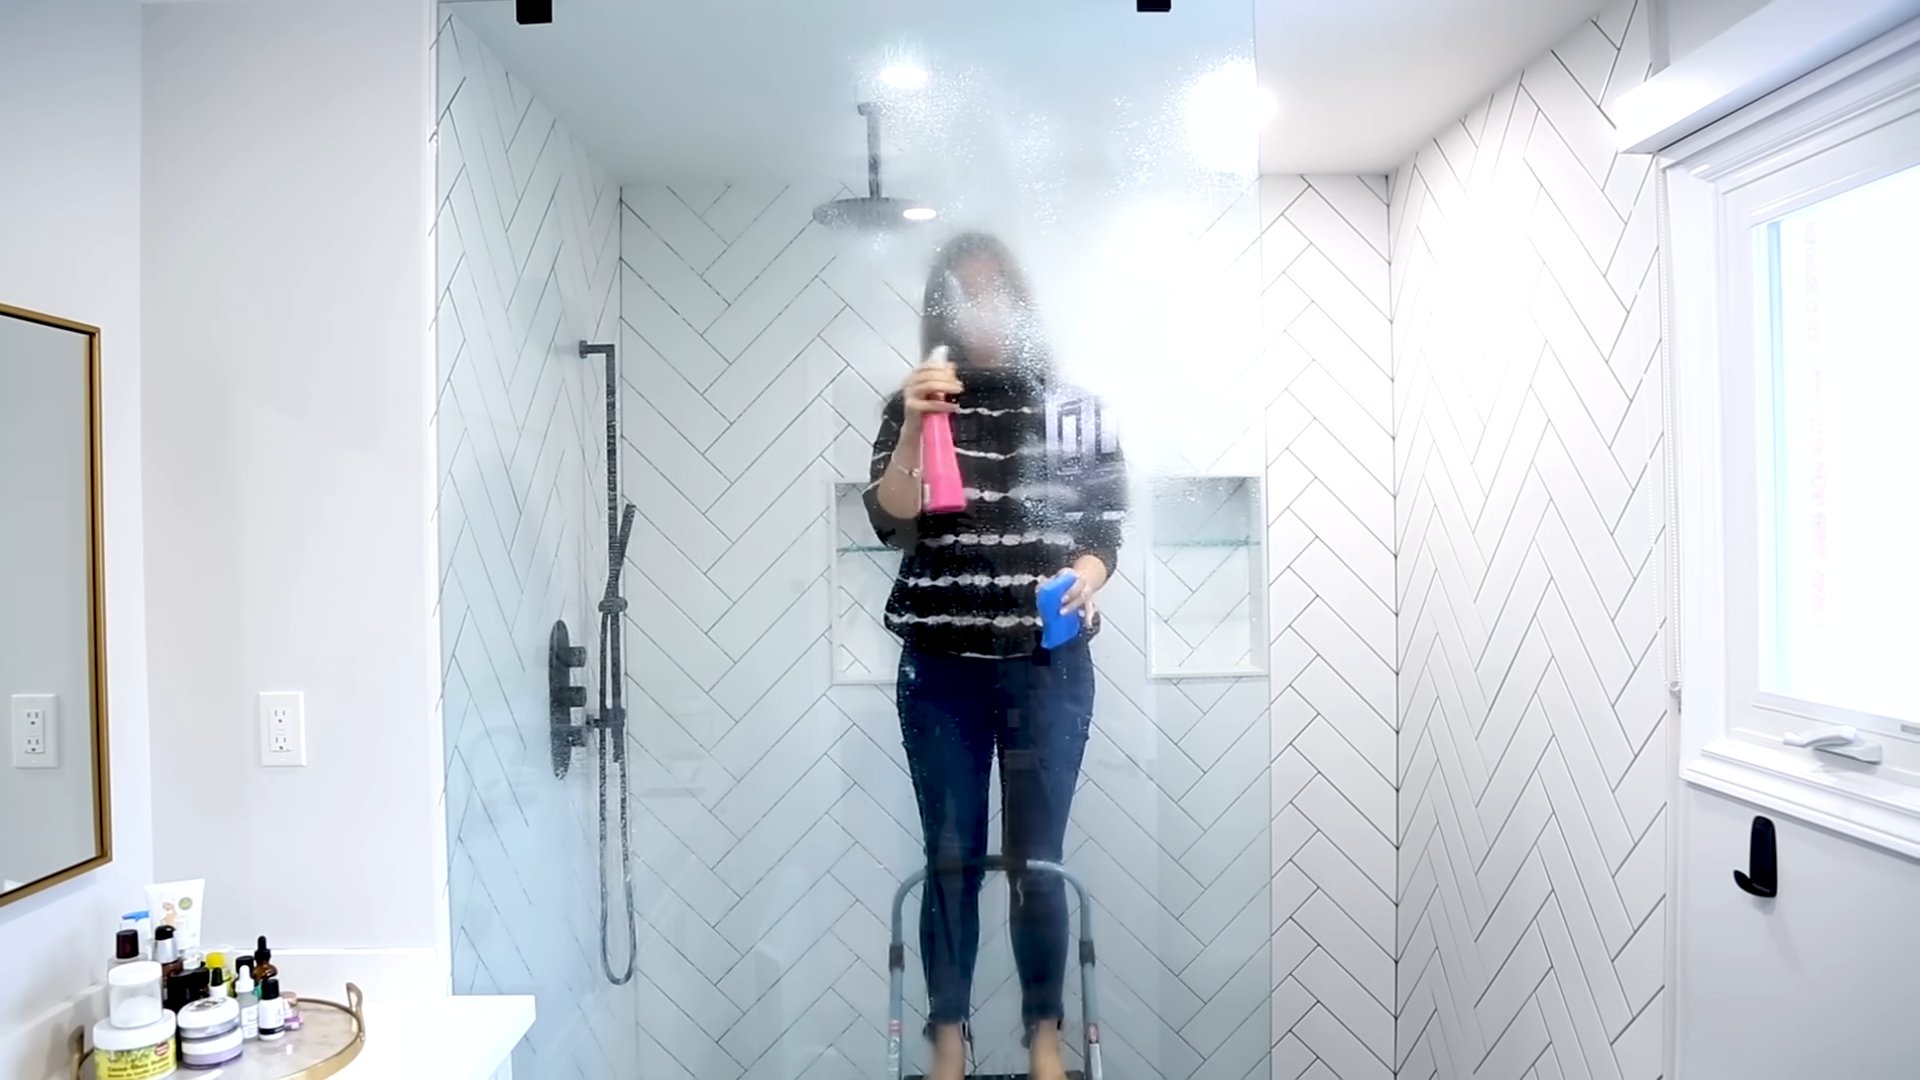
Hack 3: Sparkling Shower Doors (Goodbye Soap Scum!)
Soap scum is the bane of every bathroom cleaner’s existence. But fear not! This simple solution will make your shower doors gleam.
What You’ll Need:
* White vinegar
* Dish soap
* Spray bottle
* Microfiber cloth or sponge
Step-by-Step Instructions:
1. Mix the Solution: In a spray bottle, mix equal parts white vinegar and dish soap. Gently swirl to combine (avoid shaking vigorously, as this can create excessive bubbles).
2. Spray the Doors: Spray the solution liberally onto the shower doors, covering all areas affected by soap scum.
3. Let it Sit: Allow the solution to sit on the doors for about 10-15 minutes. This gives the vinegar and dish soap time to break down the soap scum.
4. Scrub (if needed): For heavy soap scum buildup, you may need to lightly scrub the doors with a microfiber cloth or sponge.
5. Rinse Thoroughly: Rinse the shower doors thoroughly with water.
6. Dry: Dry the doors with a clean microfiber cloth to prevent water spots.
Hack 4: Toilet Bowl Cleaning Power
Skip the harsh chemicals and try this natural toilet bowl cleaner.
What You’ll Need:
* Baking soda
* White vinegar
* Toilet brush
Step-by-Step Instructions:
1. Sprinkle Baking Soda: Sprinkle about 1 cup of baking soda into the toilet bowl, making sure to coat the sides as well as the bottom.
2. Pour in Vinegar: Slowly pour about 1 cup of white vinegar into the toilet bowl. The mixture will fizz – this is normal!
3. Let it Fizz: Allow the mixture to fizz and sit for about 10-15 minutes. This allows the baking soda and vinegar to loosen stains and grime.
4. Scrub: Use a toilet brush to scrub the entire toilet bowl, paying attention to any stains or rings.
5. Flush: Flush the toilet to rinse away the cleaning mixture and any loosened debris.
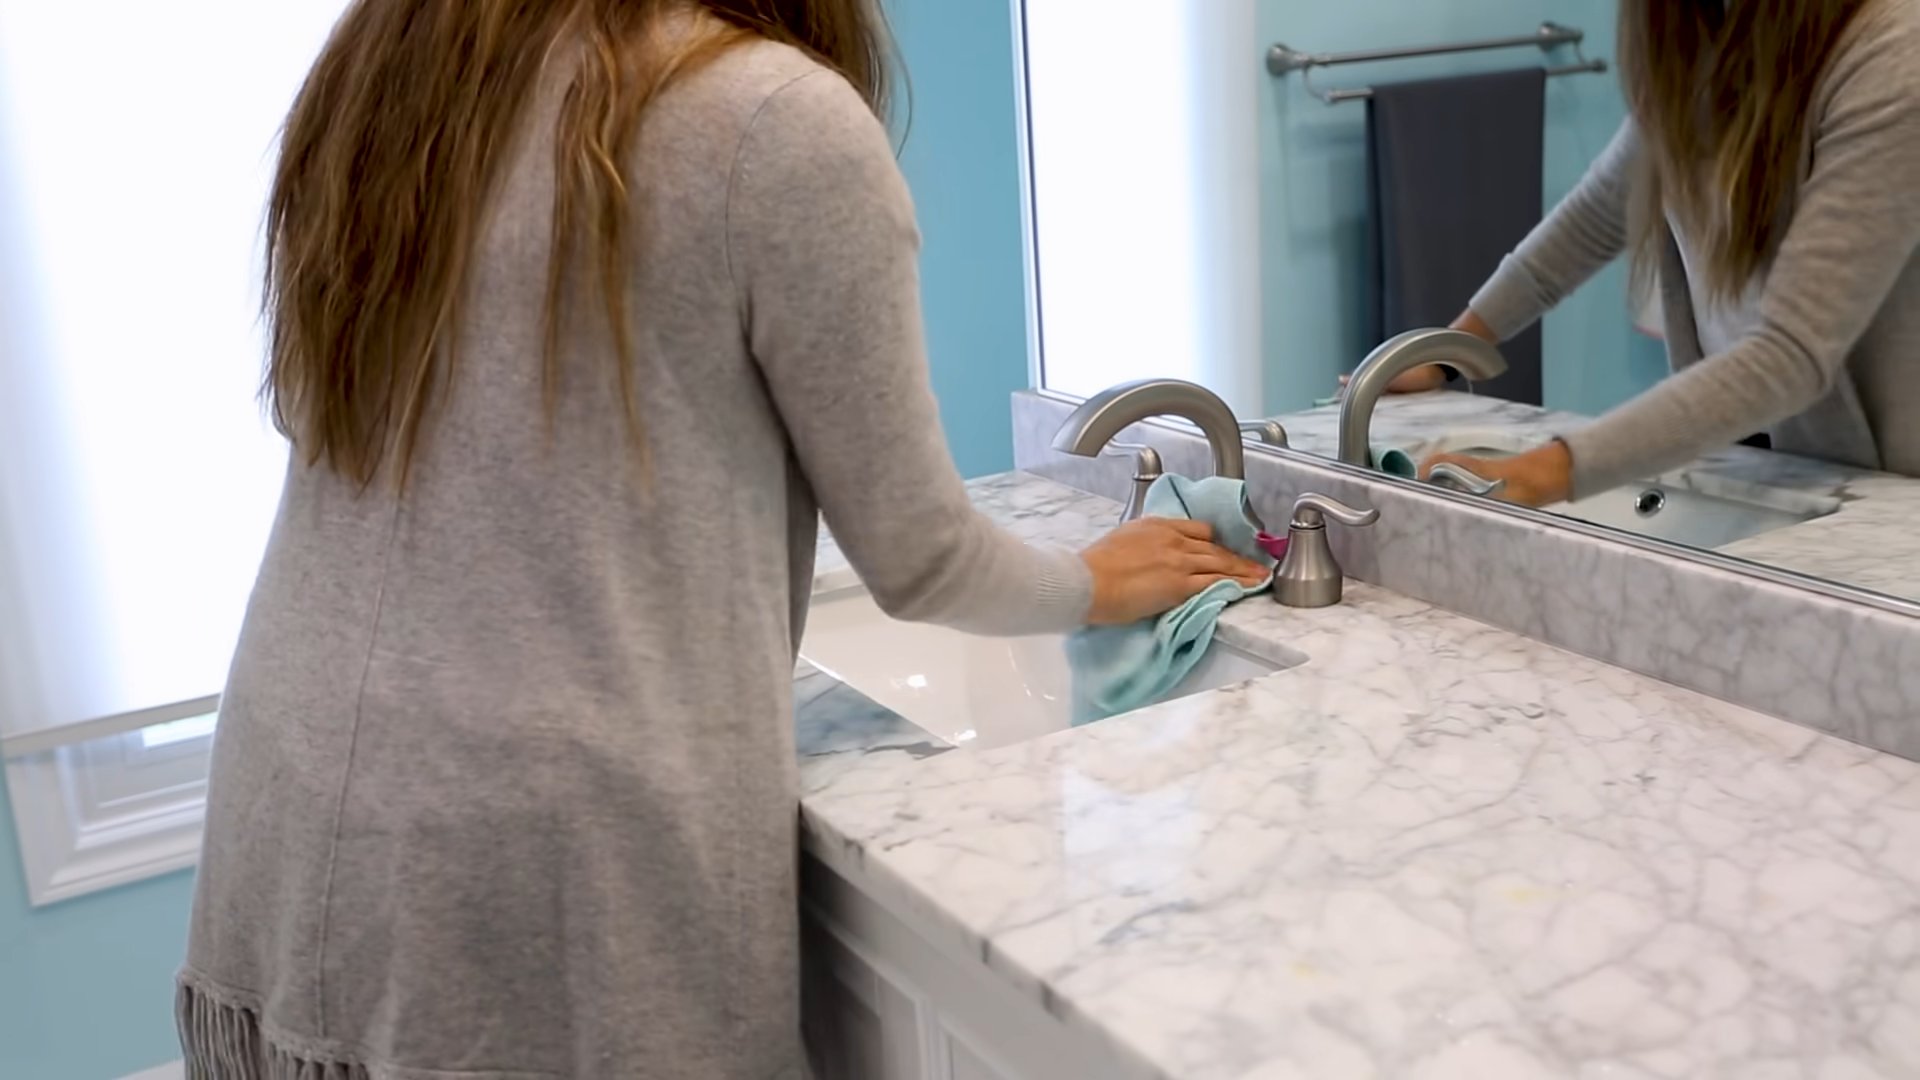
Hack 5: Mirror, Mirror on the Wall (Streak-Free Shine!)
Achieving a streak-free shine on your bathroom mirror is easier than you think!
What You’ll Need:
* White vinegar
* Water
* Spray bottle
* Microfiber cloth
Step-by-Step Instructions:
1. Mix the Solution: In a spray bottle, mix equal parts white vinegar and water.
2. Spray the Mirror: Lightly spray the mirror with the vinegar and water solution.
3. Wipe with Microfiber Cloth: Immediately wipe the mirror with a clean, dry microfiber cloth. Use a circular motion to remove any streaks.
4. Buff (if needed): If you still see any streaks, buff the mirror with a clean, dry section of the microfiber cloth.
Hack 6: Drain Declogging Delight
Clogged drains are a common bathroom problem. Here’s a simple and effective way to clear them without harsh chemicals.
What You’ll Need:
* Baking soda
* White vinegar
* Boiling water
Step-by-Step Instructions:
1. Pour in Baking Soda: Pour about 1/2 cup of baking soda down the drain.
2. Add Vinegar: Pour about 1 cup of white vinegar down the drain. The mixture will fizz.
3. Let it Fizz: Let the mixture fizz and sit for about 30 minutes. This allows the baking soda and vinegar to break down the clog.
4. Flush with Boiling Water: Carefully pour a pot of boiling water down the drain. The hot water will help to flush away the loosened clog.
5. Repeat if Necessary: If the drain is still clogged, repeat the process. For stubborn clogs, you may need to use a plunger after flushing with boiling water.
Hack 7: Freshen Up with Essential Oils
A clean bathroom should also smell fresh! Here’s a simple way to add a pleasant scent using essential oils.
What You’ll Need:
* Essential oil(s) of your choice (lavender, eucalyptus, tea tree, lemon, and peppermint are all great options for the bathroom)
* Cotton balls
* Small dish or container
Step-by-Step Instructions:
1. Saturate Cotton Balls: Place a few cotton balls in a small dish or container.
2. Add Essential Oils: Add a few drops of your chosen essential oil(s) to the cotton balls.
3. Place in Bathroom: Place the dish or container in a discreet location in your bathroom, such as on a shelf or behind the toilet.
4. Refresh as Needed: Refresh the cotton balls with more essential oil every few days, or as needed, to maintain the scent.
Hack 8: Organize Your Countertops
A cluttered countertop can make even a clean bathroom feel messy. Take a few minutes to organize your toiletries and accessories.
What You’ll Need:
* Storage containers (baskets, trays, jars)
* Drawer organizers
* Labels (optional)
Step-by-Step Instructions:
1. Declutter: Start by decluttering your countertops. Get rid of any items you don’t use regularly or that are expired.
2. Categorize: Group your remaining items into categories, such as skincare, makeup, hair products, etc.
3.
Conclusion
So, there you have it! These quick bathroom cleaning hacks aren’t just about saving time; they’re about reclaiming your weekend and enjoying a sparkling clean bathroom without the elbow grease. We’ve shown you how to tackle common bathroom grime with simple ingredients you likely already have in your pantry. From dissolving stubborn hard water stains to banishing mildew with ease, these methods are effective, budget-friendly, and surprisingly satisfying.
Why is this a must-try? Because let’s face it, nobody enjoys spending hours scrubbing toilets and showers. These hacks offer a practical solution to a universal problem: a dirty bathroom. They empower you to maintain a clean and hygienic space with minimal effort, leaving you more time to focus on the things you truly enjoy. Plus, you’ll be reducing your reliance on harsh chemical cleaners, which is better for your health and the environment.
But don’t stop there! Feel free to experiment and adapt these techniques to suit your specific needs and preferences. For instance, if you’re dealing with particularly stubborn soap scum, try adding a bit of baking soda to your vinegar solution for extra scrubbing power. Or, if you prefer a more fragrant cleaning experience, infuse your vinegar with citrus peels for a refreshing scent. You can even use old toothbrushes to get into those hard-to-reach corners and crevices.
Consider these variations:
* Essential Oil Boost: Add a few drops of your favorite essential oil (tea tree, lavender, or eucalyptus are great choices) to your cleaning solutions for an added antibacterial and aromatic boost.
* Lemon Power: Use lemon juice instead of vinegar for a naturally acidic cleaner with a pleasant citrus scent. This is particularly effective for removing hard water stains.
* DIY Cleaning Paste: Create a paste of baking soda and water for a gentle abrasive cleaner that’s perfect for scrubbing sinks and tubs.
* Shower Head Soak: Fill a plastic bag with vinegar and secure it around your shower head with a rubber band. Let it soak overnight to dissolve mineral buildup.
Ultimately, the best way to discover the effectiveness of these quick bathroom cleaning hacks is to try them yourself. We’re confident that you’ll be amazed at how much time and effort you can save. So, grab your supplies, roll up your sleeves (metaphorically, of course – these hacks are so easy you might not even need to!), and get ready to transform your bathroom into a sparkling oasis.
We’d love to hear about your experiences! Share your before-and-after photos, your favorite variations, and any other tips you’ve discovered in the comments below. Let’s create a community of clean bathroom enthusiasts! Your insights could help others discover the joy of a clean bathroom without the hassle. Let us know which of these **quick bathroom cleaning hacks** worked best for you!
Frequently Asked Questions
Q: Are these cleaning hacks safe for all bathroom surfaces?
A: Generally, yes, these hacks are safe for most common bathroom surfaces like tile, porcelain, glass, and stainless steel. However, it’s always a good idea to test any cleaning solution in an inconspicuous area first, especially on more delicate surfaces like natural stone (marble, granite) or painted surfaces. Vinegar, in particular, can etch some natural stones, so use it with caution or opt for a gentler alternative like baking soda paste. For painted surfaces, ensure the solution doesn’t cause discoloration or damage to the finish. When in doubt, consult the manufacturer’s recommendations for cleaning specific surfaces.
Q: How often should I use these cleaning hacks?
A: The frequency of cleaning depends on how often your bathroom is used and how quickly it gets dirty. For general maintenance, a quick cleaning session using these hacks once a week should be sufficient to keep your bathroom sparkling. However, high-traffic bathrooms or those prone to mildew may require more frequent attention. Spot cleaning spills and messes as they occur will also help prevent buildup and make your regular cleaning sessions easier. Consider establishing a cleaning routine that fits your lifestyle and bathroom usage.
Q: What if I don’t have vinegar or baking soda? Are there any alternatives?
A: While vinegar and baking soda are staples in many DIY cleaning solutions, there are alternatives you can use. Lemon juice is a great substitute for vinegar due to its acidic properties. It’s particularly effective for removing hard water stains and leaving a fresh scent. For baking soda, you can use a mild dish soap or a commercial bathroom cleaner, but be sure to choose one that is non-abrasive and safe for your bathroom surfaces. Remember to always follow the product instructions and test in an inconspicuous area first.
Q: How do I get rid of stubborn mildew in my shower?
A: Mildew can be a persistent problem in bathrooms due to the warm, humid environment. For stubborn mildew, a stronger solution may be necessary. Try creating a paste of baking soda and water, applying it to the affected areas, and letting it sit for several hours or overnight. Then, scrub with a brush and rinse thoroughly. Alternatively, you can use a solution of bleach and water (1 part bleach to 10 parts water), but be sure to wear gloves and eye protection, and ventilate the area well. Apply the bleach solution to the mildewed areas, let it sit for a few minutes, and then rinse thoroughly. Always test the bleach solution in an inconspicuous area first to ensure it doesn’t damage the surface. For preventative measures, ensure proper ventilation in your bathroom and wipe down surfaces after each shower.
Q: Can I use these hacks to clean my toilet bowl?
A: Yes, these hacks can be used to clean your toilet bowl. Pour a cup of vinegar into the toilet bowl and let it sit for at least 30 minutes, or preferably overnight. Then, sprinkle baking soda into the bowl and scrub with a toilet brush. The combination of vinegar and baking soda will create a fizzing action that helps to loosen stains and grime. Flush the toilet to rinse. For tougher stains, you can use a toilet bowl cleaner specifically designed for that purpose.
Q: Are these DIY cleaners environmentally friendly?
A: Yes, these DIY cleaners are generally more environmentally friendly than commercial cleaners. Vinegar, baking soda, and lemon juice are all natural and biodegradable ingredients that are less harmful to the environment than the harsh chemicals found in many commercial cleaning products. By using these DIY cleaners, you can reduce your carbon footprint and contribute to a healthier planet. However, it’s important to dispose of any cleaning solutions properly and avoid pouring them down drains where they could contaminate water sources.
Q: What’s the best way to prevent bathroom grime buildup in the first place?
A: Prevention is key to keeping your bathroom clean and minimizing the need for extensive cleaning sessions. Here are a few tips to prevent grime buildup:
* Ventilate your bathroom: Run the exhaust fan during and after showers to reduce humidity and prevent mildew growth.
* Wipe down surfaces: After each shower, wipe down the shower walls and door with a squeegee or towel to remove excess water and prevent water spots.
* Use a shower spray: Spray a daily shower cleaner after each shower to help prevent soap scum and mildew buildup.
* Clean regularly: Establish a regular cleaning routine and stick to it. Even a quick 15-minute cleaning session once a week can make a big difference.
* Use a water softener: If you have hard water, consider installing a water softener to reduce mineral buildup on your bathroom fixtures.
Q: I have sensitive skin. Are these cleaning solutions safe for me to use?
A: While these DIY cleaning solutions are generally gentler than commercial cleaners, they can still irritate sensitive skin. It’s always a good idea to wear gloves when cleaning, regardless of the cleaning solution you’re using. If you have particularly sensitive skin, you may want to dilute the cleaning solutions further or test them on a small area of skin before using them extensively. You can also look for natural cleaning products that are specifically formulated for sensitive skin.


Leave a Comment