

Remove Ink Stains Clothes? Don’t panic! We’ve all been there – that dreaded moment when a rogue pen explodes, leaving an unsightly mark on your favorite shirt or pair of pants. It feels like a disaster, right? But before you resign that garment to the donation pile, let me tell you, there’s hope! For generations, resourceful individuals have been developing clever ways to tackle these pesky stains, passing down tips and tricks like treasured family secrets.
Think about it: ink has been used for writing and art for centuries, from ancient calligraphy to modern-day masterpieces. So, it’s no surprise that people have also been figuring out how to remove ink stains clothes for just as long! But in today’s fast-paced world, who has time to experiment with old wives’ tales? That’s where this DIY guide comes in.
I know how frustrating it is to ruin a perfectly good piece of clothing. That’s why I’ve compiled a collection of tried-and-true methods that are not only effective but also easy to do with common household items. You’ll save money on expensive stain removers and, more importantly, you’ll save your beloved clothes! So, let’s dive in and learn how to banish those ink stains for good!
DIY Ink Stain Removal: Saving Your Clothes, One Step at a Time!
Okay, so you’ve got an ink stain. Don’t panic! We’ve all been there. Whether it’s a rogue pen explosion in your pocket or a leaky marker incident, ink stains can seem like the kiss of death for your favorite clothes. But fear not! I’m here to guide you through a few tried-and-true methods to banish those pesky stains and bring your garments back to life.
Understanding the Enemy: Ink Types
Before we dive in, it’s helpful to know what kind of ink you’re dealing with. Different inks react differently to various treatments. While we’ll cover general methods, keep in mind that some inks might require a bit more persistence.
* Ballpoint Pen Ink: This is the most common culprit. Usually oil-based, it can be tricky but often responds well to solvents.
* Gel Pen Ink: Water-based and pigment-rich, gel pen ink can sometimes be easier to remove than ballpoint, but its vibrant colors can leave a stubborn shadow.
* Permanent Marker Ink: The name says it all! These inks are designed to be, well, permanent. Removal is possible, but it requires stronger solvents and a lot of patience.
* Fountain Pen Ink: Often water-based, fountain pen ink can be surprisingly delicate. Blotting is key!
The Golden Rule: Act Fast!
The sooner you tackle an ink stain, the better your chances of removing it completely. Fresh stains are far easier to lift than those that have had time to set and bond with the fabric. So, as soon as you notice the stain, get to work!
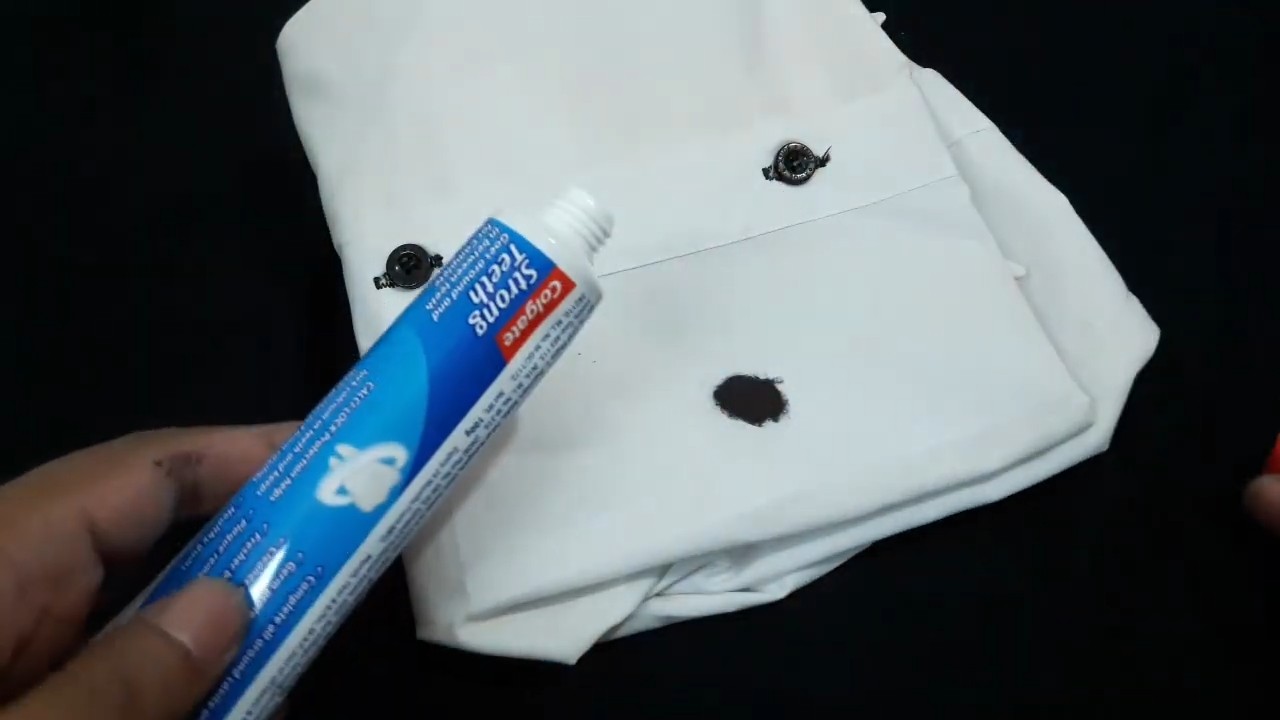
Method 1: Rubbing Alcohol to the Rescue
Rubbing alcohol (isopropyl alcohol) is a fantastic first line of defense against many ink stains, especially ballpoint.
Materials You’ll Need:
* Rubbing alcohol (70% or higher is best)
* Clean white cloths or paper towels
* An eyedropper or cotton swab (optional, for precision)
* A small bowl
* Laundry detergent
Step-by-Step Instructions:
1. Test in an Inconspicuous Area: Before you douse the entire stain, test the rubbing alcohol on a hidden part of the garment, like an inside seam. This ensures that the alcohol won’t damage or discolor the fabric. Let it sit for a few minutes, then blot with a clean cloth. If there’s no adverse reaction, proceed to the next step.
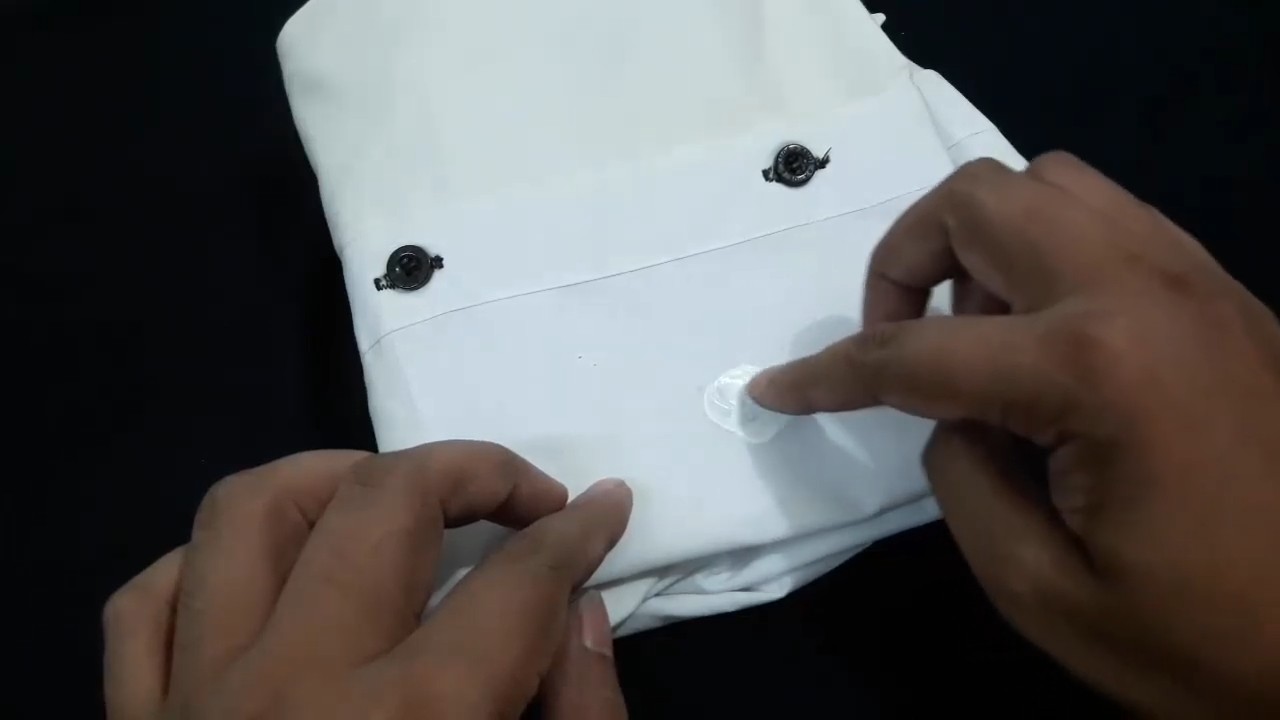
2. Blot, Don’t Rub!: This is crucial! Rubbing will only spread the ink and grind it deeper into the fibers. Instead, gently blot the stain with a clean white cloth or paper towel to absorb as much of the fresh ink as possible.
3. Apply Rubbing Alcohol: Pour a small amount of rubbing alcohol into the small bowl. Using an eyedropper or cotton swab, carefully apply the alcohol directly to the ink stain. You want to saturate the stained area without soaking the surrounding fabric.
4. Blot Again: Immediately after applying the alcohol, blot the stain with a clean section of the white cloth or paper towel. You should see the ink transferring from the fabric to the cloth.
5. Repeat, Repeat, Repeat!: Continue applying rubbing alcohol and blotting with clean sections of the cloth until you see minimal ink transferring. This may take several repetitions, so be patient.
6. Rinse with Cold Water: Once you’ve removed as much ink as possible, rinse the treated area with cold water. This will help to remove any remaining alcohol and prevent it from setting into the fabric.
7. Launder as Usual: Wash the garment in your washing machine according to the care label instructions. Use your regular laundry detergent.
8. Air Dry (Important!): Do NOT put the garment in the dryer until you’re absolutely sure the stain is gone. The heat from the dryer can set any remaining ink, making it virtually impossible to remove. Air dry the garment completely.
9. Inspect and Repeat if Necessary: Once the garment is dry, inspect the area where the stain was. If you still see a faint shadow of the ink, repeat the entire process. Sometimes, stubborn stains require multiple treatments.
Method 2: Hairspray to the Rescue (Yes, Really!)
Believe it or not, hairspray can be surprisingly effective at removing ink stains, especially from synthetic fabrics. The alcohol content in many hairsprays helps to dissolve the ink.
Materials You’ll Need:
* Hairspray (aerosol type works best)
* Clean white cloths or paper towels
* Laundry detergent
Step-by-Step Instructions:
1. Test First (Again!): As with the rubbing alcohol, test the hairspray on an inconspicuous area of the garment to ensure it doesn’t cause any damage or discoloration.
2. Spray the Stain: Hold the hairspray can a few inches away from the stain and spray it liberally, saturating the affected area.
3. Let it Sit: Allow the hairspray to sit on the stain for about 5-10 minutes. This gives the alcohol time to break down the ink.
4. Blot with a Clean Cloth: After the hairspray has sat, blot the stain with a clean white cloth or paper towel. You should see the ink transferring to the cloth.
5. Repeat as Needed: Repeat the spraying and blotting process until you’ve removed as much ink as possible.
6. Launder as Usual: Wash the garment in your washing machine according to the care label instructions.
7. Air Dry: Again, air dry the garment to avoid setting any remaining stain.
8. Inspect and Repeat: Check the garment after it’s dry. If the stain is still visible, repeat the process.
Method 3: Milk Magic
This might sound a little strange, but milk can sometimes work wonders on ink stains, especially on delicate fabrics. The proteins in milk help to bind to the ink molecules and lift them away from the fibers.
Materials You’ll Need:
* Milk (whole milk or 2% works best)
* A shallow dish or bowl
* Clean white cloths or paper towels
* Laundry detergent
Step-by-Step Instructions:
1. Soak the Stain: Pour enough milk into the shallow dish to completely submerge the stained area of the garment.
2. Let it Soak: Allow the garment to soak in the milk for at least 30 minutes, or even longer for stubborn stains. You can gently agitate the fabric in the milk occasionally to help loosen the ink.
3. Rinse with Cold Water: After soaking, rinse the garment thoroughly with cold water to remove the milk.
4. Launder as Usual: Wash the garment in your washing machine according to the care label instructions.
5. Air Dry: Air dry the garment to prevent setting any remaining stain.
6. Inspect and Repeat: Check the garment after it’s dry. If the stain is still visible, repeat the process or try another method.
Method 4: Baking Soda Paste Power
Baking soda is a mild abrasive and absorbent that can help lift ink stains from fabric.
Materials You’ll Need:
* Baking soda
* Water
* A small bowl
* A clean toothbrush or soft cloth
* Laundry detergent
Step-by-Step Instructions:
1. Make a Paste: In the small bowl, mix baking soda with a small amount of water to create a thick paste. The consistency should be similar to toothpaste.
2. Apply the Paste: Apply the baking soda paste directly to the ink stain, covering it completely.
3. Gently Scrub: Using a clean toothbrush or soft cloth, gently scrub the paste into the stain in a circular motion. Be careful not to scrub too hard, as this could damage the fabric.
4. Let it Sit: Allow the paste to sit on the stain for at least 30 minutes, or even longer for stubborn stains.
5. Rinse with Cold Water: After the paste has sat, rinse the garment thoroughly with cold water to remove the baking soda.
6. Launder as Usual: Wash the garment in your washing machine according to the care label instructions.
7. Air Dry: Air dry the garment to prevent setting any remaining stain.
8. Inspect and Repeat: Check the garment after it’s dry. If the stain is still visible, repeat the process or try another method.
Method 5: Lemon Juice and Sunshine
Lemon juice is a natural bleaching agent that can help fade ink stains, especially on white or light-colored fabrics.
Materials You’ll Need:
* Lemon juice (freshly squeezed is best)
* A clean white cloth
* Laundry detergent
Step-by
Conclusion
So, there you have it! Removing ink stains from clothes doesn’t have to be a laundry nightmare. This simple, yet effective DIY trick offers a lifeline for your favorite garments, saving you money and the heartache of saying goodbye to ink-stained treasures. Forget harsh chemicals and expensive dry cleaning bills; this method utilizes common household items and a little bit of patience to lift those stubborn ink marks.
Why is this a must-try? Because it’s gentle on your fabrics, tough on stains, and incredibly accessible. You likely already have everything you need sitting in your pantry or bathroom cabinet. Plus, it’s a fantastic alternative to commercial stain removers that can sometimes damage delicate materials or leave behind unwanted residues.
Looking for variations? For particularly stubborn ink stains, you can try pre-treating the area with a paste made from baking soda and water before applying the rubbing alcohol. Let the paste sit for about 30 minutes to help draw out the ink. Another option is to use hairspray (the kind with a high alcohol content) as a substitute for rubbing alcohol. Just be sure to test it on an inconspicuous area of the garment first to ensure it doesn’t cause any discoloration. For colored clothing, consider using milk to soak the stain before applying any other treatment. Milk has enzymes that can help break down the ink without bleaching the fabric.
Don’t be intimidated by the thought of tackling ink stains. This DIY method is straightforward and yields impressive results. The key is to act quickly and be persistent. Remember to blot, not rub, to avoid spreading the stain further. And always test your chosen method on a hidden area of the fabric first to ensure colorfastness.
We’re confident that this DIY trick for removing ink stains will become your go-to solution for ink-related laundry emergencies. It’s a game-changer for anyone who’s ever accidentally marked their clothes with a pen.
Now, it’s your turn! Give this DIY method a try and see the magic for yourself. We’re eager to hear about your experiences and any variations you discover along the way. Share your success stories, tips, and tricks in the comments below. Let’s build a community of stain-fighting experts and help each other keep our clothes looking their best! Your feedback will not only help other readers but also inspire us to create more helpful and practical DIY solutions. So, grab that ink-stained garment, gather your supplies, and get ready to say goodbye to those pesky ink marks. Happy stain removing!
Frequently Asked Questions (FAQ)
What kind of rubbing alcohol should I use?
It’s best to use isopropyl alcohol with a concentration of 70% or higher. The higher the alcohol content, the more effective it will be at dissolving the ink. You can typically find this at your local drugstore or pharmacy. Avoid using rubbing alcohol that contains added fragrances or dyes, as these could potentially stain your clothes.
Will this method work on all types of ink?
This method is generally effective on most types of ink, including ballpoint pen ink, gel pen ink, and some types of marker ink. However, the success rate may vary depending on the type of ink, the fabric of the garment, and how long the stain has been present. Older, set-in stains may be more difficult to remove. For permanent marker stains, you may need to use a stronger solvent, such as acetone (nail polish remover), but be extremely cautious when using acetone, as it can damage certain fabrics. Always test it on an inconspicuous area first.
Can I use this method on delicate fabrics like silk or wool?
Yes, but with extreme caution. Delicate fabrics require a gentler approach. It’s crucial to test the rubbing alcohol on a hidden area of the garment first to ensure it doesn’t cause any discoloration or damage. If the fabric seems to be reacting negatively, dilute the rubbing alcohol with water before applying it to the stain. You can also try using a cotton swab to gently dab the stain instead of pouring the alcohol directly onto the fabric. For very delicate fabrics, it’s always best to consult a professional dry cleaner.
How long should I let the rubbing alcohol sit on the stain?
You typically only need to let the rubbing alcohol sit on the stain for a few minutes – usually 5-10 minutes is sufficient. The goal is to allow the alcohol to dissolve the ink without soaking the fabric for too long. After the allotted time, blot the area with a clean cloth or paper towel to absorb the ink. Repeat the process as needed until the stain is gone or significantly faded.
What if the stain is still visible after trying this method?
If the stain is still visible after several attempts, don’t give up! You can try pre-treating the area with a stain remover specifically designed for ink stains. Follow the instructions on the stain remover label carefully. Alternatively, you can try soaking the garment in a solution of cold water and laundry detergent for a few hours or overnight before washing it. For stubborn stains, you may need to repeat the process multiple times or consult a professional dry cleaner.
Can I put the garment in the dryer after treating the stain?
No! Do not put the garment in the dryer until you are absolutely certain that the stain is completely gone. The heat from the dryer can set the stain, making it much more difficult to remove. If the stain is still visible after washing, repeat the treatment process and wash the garment again before drying it.
What if I don’t have rubbing alcohol? What else can I use?
If you don’t have rubbing alcohol on hand, you can try using hairspray (the kind with a high alcohol content) as a substitute. Apply the hairspray to the stain, let it sit for a few minutes, and then blot it with a clean cloth. Another option is to use hand sanitizer, which also contains alcohol. In a pinch, you can even try using white vinegar or lemon juice, although these may not be as effective as rubbing alcohol. Always test any alternative on an inconspicuous area of the garment first.
Does this method work on all colors of clothing?
This method is generally safe for most colors of clothing, but it’s always a good idea to test it on a hidden area first, especially for brightly colored or delicate fabrics. Rubbing alcohol can sometimes cause colors to fade or bleed, so it’s important to be cautious. If you’re concerned about colorfastness, you can try diluting the rubbing alcohol with water or using a gentler alternative, such as milk or a stain remover specifically designed for colored fabrics.
How do I prevent ink stains in the first place?
Prevention is always better than cure! To prevent ink stains, avoid carrying pens in your pockets or bags without a cap. Use pens with retractable tips to prevent accidental leaks. If you’re working with ink, wear an apron or old clothes to protect your garments. And if you do happen to get ink on your clothes, act quickly to treat the stain before it sets.
Is this method safe for all types of fabrics?
While this method is generally safe, certain fabrics like acetate, triacetate, or modacrylic may react negatively to rubbing alcohol. Always check the garment’s care label before attempting any stain removal method. If you’re unsure about the fabric content, it’s best to consult a professional dry cleaner.
Leave a Comment